


OBSERVING
Choosing an Eyepiece
A telescope’s eyepiece magnifies the image formed by the telescope’s main optics.
Each eyepiece has a focal length, expressed in millimeters, or “mm.” The smaller the
focal length, the higher the magnification. For example: An eyepiece with a focal
length of 9mm has a higher magnification than an eyepiece with a focal length of
26mm.
Your telescope comes supplied with an UltraWide 24mm eyepiece which gives a
wide, comfortable field of view with high image resolution.
Low power eyepieces offer a wide field of view, bright, high-contrast images, and eye
relief during long observing sessions. To find an object with a telescope, always start
with a lower power eyepiece such as the UltraWide 24mm. When the object is locat-
ed and centered in the eyepiece, you may wish to switch to a higher power eyepiece
to enlarge the image as much as practical for prevailing seeing conditions. For infor-
mation about optional eyepieces for your telescope, see
OPTIONAL ACCESSORIES,
pages 48 - 50.
The power, or magnification of a telescope is determined by the focal length of the tel-
escope and the focal length of the eyepiece being used (an eyepiece's focal length is
printed on the side of the eyepiece). To calculate eyepiece power, divide the tele-
scope's focal length by the eyepiece's focal length.
For example: A 24mm eyepiece is
supplied with
RCX400 models. The focal length of the 12" f/8 RCX400 is 2438mm (see
SPECIFICATIONS, pages 54 - 56).
Eyepiece Power = Telescope focal length ÷ Eyepiece focal length
Eyepiece Power = 2438mm ÷ 24mm
Eyepiece Power = 102
The eyepiece power, or magnification is therefore 102X (approximately).
Note: For a list of magnification ratings of the eyepieces available for the
RCX400 telescopes, see OPTIONAL ACCESSORIES, pages 48 - 50.
Focusing the Telescope
All focusing of the RCX400 is performed digitally, using AutoStar II’s Focus key
(number key 4). The Focus key functions as a toggle key:
ܖ Press the Focus key the first time to focus the telescope eyepiece and to control
the speed at which you focus.
ܖ Press the Focus key again to set and adjust up to nine focus presets.
To change the focus speed:
1. Press the Focus key once. “Focuser: Fast (or the current speed)” displays for
two seconds. Use one of the Scroll keys to scroll through the list of 4 available
focus speeds: Fast, Medium, Slow, Fine. Scroll through the list until the speed
y
ou desire displa
ys
. Choose a focus speed with which you feel comfortable.
To focus the telescope eyepiece:
1. Press the Focus key once. “Focuser: Fast (or the current speed)” displays. After
two seconds, “Focuser: Position = XX” displays. “XX” stands for a number value
in decimal millimeters
.
2. Point the telescope at a distant object. Look in the eyepiece and use the Arrow
keys until the image in the eyepiece is in sharp focus.
Presets:
If y
ou “Park” your telescope, you do not have to refocus the telescope each time you
use it. Nine preset focus positions are available, and they operate much like presets
on a car radio—everyone can have their own favorite station, or in this case, their own
personalized focus. You can set one preset to take into account your own eyesight,
one f
or your observing partner (who may wear glasses), one for your camera’s focus,
and so forth.
Three preset menus are available. Use the Define Preset menu to assign a preset,
use the GoTo Preset menu to select a preset you have previously assigned, and use
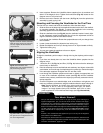
Important Note:
Objects appear upside-down
and reversed left-for-right
when observed in the
viewfinder. Objects viewed
through the telescope eye-
piece when inserted into the
diagonal prism assembly
appear right-side-up, but
reversed left-for-right.
This image inversion is of no
consequence when observ-
ing astronomical objects and,
in fact, all astronomical tele-
scopes yield inverted
images.
During terrestrial observing,
where a fully-correctly-orient-
ed image (right-side-up and
correct left-for-right) is desir-
able, an optional #928 45°
Erecting Prism and optional
1.25” eyepiece holder are
available. See
OPTIONAL
ACCESSORIES, pages 48 -
50.
19
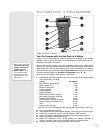
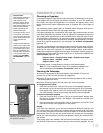
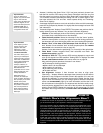
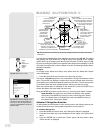
Fig. 25: Focus is all-digital, using the
Focus key (the #4 Number key) of
the AutoStar II handbox.
FOCUS
KEY