


[4] DISASSEMBLY/ASSEMBLY
[4]-10. Carburetor section (cont.)
Repair
P 15/ 22
Fig. 67
Fig. 69
Fig. 68
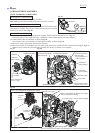
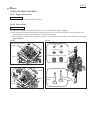
Tube 3-250 (black)*
between Carburetor
and Fuel tank
*The component of
Tube complete
Tube 3-120 (blue)
between Primer pump
and Carburetor
Tube 3-35 between Carburetor
and Insulator complete
ASSEMBLING CARBURETOR
Assemble by reversing the disassembly procedure.
Note: Make sure that the assembling direction of each part is correct.
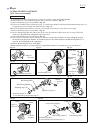
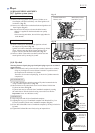
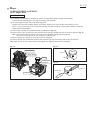
VACUUM LEAK TEST OF CARBURETOR
Connect 1R127 with the fuel inlet of Carburetor, then increase the testing
pressure up to 0.05Mpa. The pressure will stay the same about 10 seconds
if there is no vacuum leak. (Fig. 66)
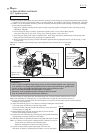
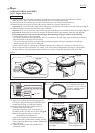
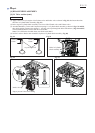
MOUNTING CARBURETOR
(1) Fasten the following parts to Cylinder block assembly with two M5x60 Pan head screws. (Fig. 67)
Carburetor gasket (2 pcs: small and large) , Carburetor, Cleaner plate assembly, Insulator complete
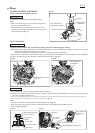
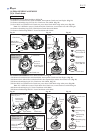
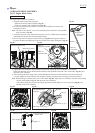
(2) Connect three Tubes to Carburetor as drawn in Fig. 68.
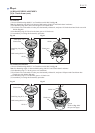
Then connect Tube 5-160 and Pipe to Cleaner plate assembly as drawn in Fig. 69.
(3) Mount Air cleaner element onto Cleaner plate assembly.
(4) Mount Air cleaner cover complete onto Air cleaner plate, then secure with M5x20 Hex socket head bolt. (Fig. 1 of [4]-2.)
Note: Be sure to fit the tab of Cleaner plate assembly into the slot of Cleaner cover assembly.
Fig. 66
1R127
Carburetor
Tube 5-160 (black) for Rocker cover outer
and Cleaner plate assembly
Clamp on Insulator completeClamp on
Rocker cover outer
Fuel tank
Primer pump
CarburetorInsulator complete
(Spiral tube 6-100 to
protect Tube 3-120)
Pipe for Cleaner plate assembly and the nipple of Cylinder block assembly
Cleaner plate assembly
Cleaner plate
assembly
(Corrugate tube)
Tube 5-160 and Pipe are connected as follows:
Tube 5-160
(black)
Cylinder
block
assembly
Pipe
Carburetor
gasket (small)
Carburetor
Carburetor gasket (large)
behind Carburetor
Cleaner plate
assembly
M5x70 Pan head
screw (2 pcs.)
Carburetor
gasket (small)
Carburetor
gasket (large)