


13
Section 1: Assembly & Set-up
1/07/09
SC2660 & SC2672 Skid Steer Rotary Cutter 326-025M
Land Pride
Table of Contents
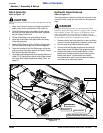
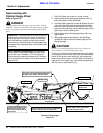
Skid Shoe Replacement
Figure 1-7
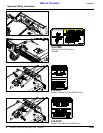
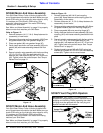
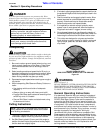
Operator Protective Door
Figure 1-8
24546
Skid Steer
Hand Hold
If needed,Locate & Cut
Notches in Door For
U-bolts Clearance.
If Needed, Locate
& Cut Notch in
Door To Clear Skid
Steer Frame.
Hook Elastic Tie-Down
To Skid Steer Cage To
Keep Door Closed.
24608
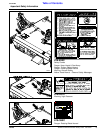
Skid Shoe Assembly (Optional)
Refer to Figure 1-7:
Cutters ordered with skid shoes are shipped loose.
Install skid shoes as follows:
1. Raise the Rotary Cutter 3" or more off the ground
and place support blocks under the cutter. Make sure
support blocks are positioned so they will not
interfere with skid shoe installation.
2. Lower cutter onto support blocks, place Skid Steer in
park, set park brakes, shut Skid Steer off and remove
switch key.
3. Install short skid shoe (#2) to the back left deck corner
as shown with 3/8”-16 x 1 1/4 GR5 plow bolts (#2), flat
washers (#6), lock washers (#5) and 3/8" lock nuts
(#4). Torque lock nuts (#4) to 31 ft-lbs.
4. Install long skid shoes (#1) to the remaining three deck
corners with 3/8”-16X1 1/4 GR5 plow bolts (#2), flat
washers (#6),lock washers (#5) and 3/8" lock nuts (#4).
Torque lock nuts (#4) to 31 ft. lbs.
5. Raise cutter up and remove support blocks.
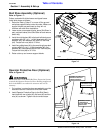
Operator Protective Door (Optional)
Refer to Figure 1-8:
!
WARNING
Do not drill holes in the ROPS (Roll Over Protection System)
to attach this Operator Protective Door. Drilling unapproved
holes in the ROPS can weaken the structure and void its
warranty.
1. Cut notches in protective door as needed to provide
clearance around u-bolts and Skid Steer frame.
2. Install Operator Protective Door to the Skid Steer’s
hand hold with two u-bolts (#3), flat bars (#2) and four
nuts (#1) as shown. Tighten nuts to correct torque.