


10
Section 1: Assembly & Set-up
SC2660 & SC2672 Skid Steer Rotary Cutter 326-025M
1/07/09
Land Pride
Table of Contents
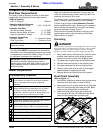
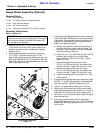
SC2660 Motor And Hose Assembly
Your Skid Steer Rotary Cutter is factory supplied with
one of three motors mounted to the deck. Make sure you
check GPM rating on the hydraulic motor decal to verify
if it matches your Skid Steer’s GPM rating. Skip
assembly instructions below if the motor GPM rating
matches your Skid Steer.
See “Motor and Hose Assembly” on page 21 to properly
select a motor that matches your Skid Steer.
Refer to Figure 1-2:
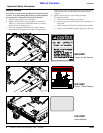
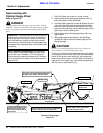
1. Remove fasteners (#1, 2, 3 & 4). Keep fasteners for
reassembly of new motor.
2. Remove existing motor and hose assembly (#5). Clean
old gasket material (#6) from gearbox flange (#7).
3. Place new gasket (#6) onto gearbox flange (#7).
4. Gently lower new motor and hose assembly (#5) onto
gasket (#6) with hoses extending towards the hitch
plate.
5. Secure hydraulic motor assembly with the four existing
1/2"-13 x 2 1/4" lg. GR 5 hex head bolts (#1), flat
washers (#4), lock washers (#3) and 1/2"-13 hex huts
(#2). Tighten nuts to the correct torque. See “Torque
Values Chart” on page 31.
SC2660 Motor and hose Assembly
Figure 1-2
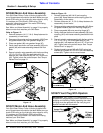
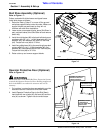
SC2672 Motor And Hose Assembly
Your Skid Steer Rotary Cutter is factory supplied with
one of three motors mounted to the deck. Make sure you
check GPM rating on the hydraulic motor decal to verify
if it matches your Skid Steer’s GPM rating. Skip
assembly instructions below if the motor GPM rating
matches your Skid Steer.
See “Motor and Hose Assembly” on page 21 to properly
select a motor that matches your Skid Steer.
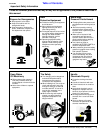
24545
Decal Location
Stating Motor
GPM Rating
Refer to Figure 1-3:
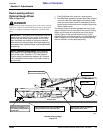
1. Remove fasteners (#9 & #10) and coupling
guard (#8). Keep fasteners and coupling guard for
reassembly of new motor.
1. Remove fasteners (#1, 2, 3 & 4). Keep fasteners for
reassembly of new motor.
2. Remove existing motor and hose assembly (#5). Clean
old gasket material (#6) from mounting flange (#7).
3. Place new gasket (#6) onto mounting flange (#7).
4. Gently slide new motor and hose assembly (#5) onto
coupling (#12) with hoses extending towards the hitch
plate.
5. Secure hydraulic motor assembly with the four existing
1/2"-13 x 2 1/4" lg. GR 5 hex head bolts (#1), flat
washers (#4), lock washers (#3) and 1/2"-13 hex huts
(#2). Tighten nuts to the correct torque. See “Torque
Values Chart” on page 31.
6. Reattach coupling guard (#8) with 5/16" spring lock
washers (#10) and 5/16"-18 x 3/4" GR5 hex head cap
screws (#9). Tighten nuts to correct torque.
SC2672 Motor and hose Assembly
Figure 1-3
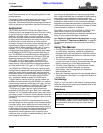
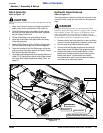
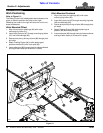
SC2672 Vent Plug With Dipstick
Figure 1-4
25732
Decal Location Stating
Motor GPM Rating
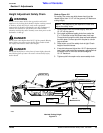
IMPORTANT: Ref. Figure 1-4. A solid plug is
shipped with the gearbox to prevent loss of oil during
shipping and handling. Before operating the cutter,
this plug must be replaced with the vent plug and
dipstick included with this manual.
20822
Oil Level
Plug
DO NOT
OVERFILL
Vented Plug
With Dipstick