


12
Section 1: Assembly & Set-up
SC2660 & SC2672 Skid Steer Rotary Cutter 326-025M
1/07/09
Land Pride
Table of Contents
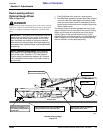
Gauge Wheel Assembly (Optional)
Required Tools:
• 1 ea. - Small hammer
• 2 ea. - 1/2" drift punches or alignment tools
• 2 ea. - 9/16" box end wrench
• 2 ea. - 3/4" box end wrench
• 1 ea. - Torque wrench with 9/16" and 3/4" sockets
Assembly Instructions:
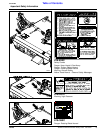
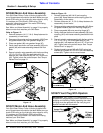
Refer to Figure 1-6:
.
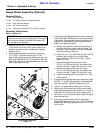
1. Remove four 3/8"-16 x 3" lg. GR5 hex head bolts (#2)
in the center of the front chain guard. Keep bolts,
washers and whiz nuts for reassembly of gauge
wheel arm (#1).
2. Install gauge wheel deck mount (#1) by inserting
1/2" x 3 3/4" lg. GR8 bolt (#3) through 1/2" flat
washer (#8), gauge wheel mounting bracket (#1) and
deck tube. Secure bolt with 1/2" flat washer (#8), lock
washer (#7) and hex nut (#4). Do not torque nut at this
time. Finger tighten nut only.
Gauge Wheel Assembly
Figure 1-6
IMPORTANT: Do not enlarging any of the 5 bolt
holes used for mounting the gauge wheel. Enlarging
bolt holes can severely decrease the longevity of
your gauge wheel operation.
24547
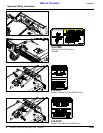
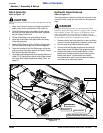
3. Checkalignment of gauge wheelfront mount holeswith
chain guard holes. Skip to step 4 if mounting holes are
in alignment. If gauge wheel mounting holes are not in
alignment, loosen remaining chain guard bolts and
realign chain guard as follows.
a. Realign chain guard by inserting drift punches in
the outer two gauge wheel mounting holes. Tap
punches in with a hammer until secure. Do not
remove punches at this time.
b. Insert 3/8"-16 x 3" lg. GR5 bolts (#2) with 3/8" flat
washers (#6) through the two inside holes.
Secure bolts with 3/8" whiz nuts (#5). Tighten
bolts to 31 ft-lbs.
c. Remove left hand drift punch and install
3/8" x 3" lg. GR5 hex bolt (#2), flat washer (#6)
and whiz nut (#5). Tighten 3/8" bolt to 31 ft-lbs.
d. Remove right hand drift punch and install
3/8" x 3" lg. GR5 hex bolt (#2), flat washer (#6)
and whiz nut (#5). Tighten 3/8" bolt to 31 ft-lbs.
e. Tighten remaining chain guard bolts to 31 ft-lbs.
f. Skip to step 5.
4. If gauge wheel mounting holes are in alignment, Install
four 3/8" x 3" lg. GR5 hex bolts (#2), flat washers (#6)
and whiz nuts (#5). Tighten 3/8" bolts to 31 ft-lbs.
5. Tighten 1/2" gauge wheel top bolt (#3) to 76 ft-lbs.
6. Attach heavy duty ratchet jack (#14) to cutter frame
and to gauge wheel deck mount (#1) with 1" x 3 3/16" lg
clevis pins (#11). Secure with hair pin cotters (#10).
7. Insert four 1 1/2" I.D. machine washers (#9) over gauge
wheel spindle (#13).
8. Insert gauge wheel spindle (#13) through yoke in
gauge wheel deck mount (#1) and 1 1/2" I.D. machine
washer (#9). Secure gauge wheel with 3/8" x 2 1/2" lg.
roll pin (#12).