


23
Section 5: Maintenance & Lubrication
12/15/15
RCF2760 and RCF2772 Rotary Cutters 326-460M
Table of Contents
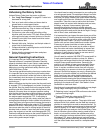
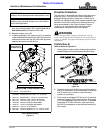
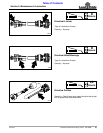
9. Insert blade bolt (#1) through cutting blade (#6), dish
pan (#4), and flat washer (#2). Secure blade with a
new locknut (#5) and torque to 450 ft-lbs.
10. Replace access cover (#5).
11. If replacing dishpan (#4), castle nut (#7) on gearbox
output shaft should be torqued to 450 ft-lbs. minimum
and secured with cotter pin (#9) with both legs bent
opposite directions around the nut.
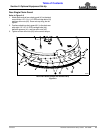
Cutter Blade Assembly
Figure 5-1
IMPORTANT: Examine blade bolts (#1) and flat
washers (#2) for excessive wear and replace if worn.
IMPORTANT: Locknuts can loose their ability to lock
properly once removed. Always use a new locknut
when installing blades.
30961
Counterclockwise Blade Rotation
Use 1-11/16"
Socket Wrench
On Blade Nut (#3)
Land Pride Cutter Blade Parts
Item Part No. Part Description
318-586A BLADE BOLT KIT (items 1, 2, & 3 below)
1 802-277C BLADE BOLT 1 1/8-12 x 3 7/16 WITH KEY
2 804-147C WASHER FLAT 1 HARD ASTMF436
3 803-170C NUT HEX TOP LOCK 1 1/8-12 PLATE
4 312-820H RCF2760 DISHPAN WELDMENT
4 312-811H RCF2772 DISHPAN WELDMENT
5 840-273C PLUG LP 3" ID RUBBER
6 820-137C RCF2760 BLADES 1/2" x 4" x 25"LG. CCW
6 820-168C RCF2772 BLADES 1/2" x 4" x 29"LG. CCW
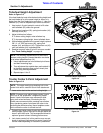
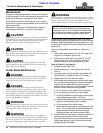
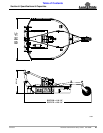
Driveline Protection
The drivetrain is protected from shock loads with a four
plate slip-clutch. The slip-clutch must be capable of
slippage during operation. Always do a “clutch run-in”
operation at the beginning of each season and after long
periods of inactivity to remove any oxidation that may
have accumulated on the friction surfaces. Repeat
“clutch run-in” instructions when moisture and/or
condensation seizes the inner friction plates.
!
WARNING
Always disengage PTO, engage parking brake, shut off
tractor, remove ignition key, and wait for all moving parts to
come to a complete stop before dismounting tractor to make
adjustments.
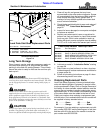
Clutch Run-In
Refer to Refer to Figure 5-2:
1. Using a pencil or other marker, scribe a line across the
exposed edges of the clutch plates and friction discs.
Clutch
Figure 5-2
2. Carefully loosen each of the 8 spring retainer nuts by
exactly 2 revolutions. It will be necessary to hold hex
end of retainer bolt in order to count the exact
number of revolutions.
3. Start tractor and engage PTO drive for 2-3 seconds
to permit slippage of the clutch surfaces. Disengage
PTO, then re-engage a second time for 2-3 seconds.
Disengage PTO, shut off tractor, and remove key.
Wait for all components to stop before dismounting
from tractor.
13693