


22
Section 4: Maintenance and Lubrication
DM3705, DM3706, and DM3707 Series Disc Mowers 327-083M
9/15/06
Table of Contents
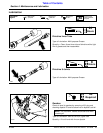
Belleville Washer Replacement
The Belleville washers on break-away bar may become
flat and weak over use and should be replaced when
cutter bar continues to break-away after resetting. See
“Safety Break-Away” on page 18 for additional
information on the Spring Washers.
Blade & Belleville Washer Pt. No’s.
Description Part No.
Cutter Blade Clockwise . . . . . . . . . . . . . . . .890-769C
Cutter Blade Counter Clockwise . . . . . . . . .890-770C
M12 Blade Bolt . . . . . . . . . . . . . . . . . . . . . .802-708C
M12 Blade Hex Flange Nut . . . . . . . . . . . . .803-311C
Break-Away Belleville Washers . . . . . . . . . .804-186C
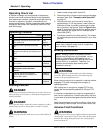
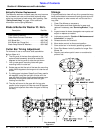
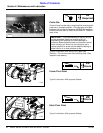
Cutter Bar Timing Adjustment
For removal of one or more disc shaft assemblies.
Refer to Figure 4-3:
6. The long axis of the two discs adjacent to the
replaced shaft assembly should be rotated 90
degrees to the long axis of cutter bar as shown
7. Line up new gear’s mounting holes with gear
mounting holes in cutter bar.
8. Rotate gear so that the axis of the two disc mounting
holes are 90 degrees to the long axis of cutter bar as
shown.
9. Try sliding gear into place. Steps 2 and 3 may need to
be repeated, using the next pair of holes until the
gear will slide into place. Apply sealant between gear
assembly housing and cutter bar and bolt gear
housing to cutter bar.
10. The disc will mount to the gear with its long axis
parallel to the long axis of cutter bar and 90 degrees
to the axis of adjacent discs when the gear is lined up
correctly.
Storage
It is good practice to clean off any dirt or grease that may
have accumulated on mower and moving parts at end of
working season or when mower will not be used for a
long time.
1. Clean Disc Mower as necessary.
2. Check blades and blade fasteners for wear and
replace if necessary, see “Servicing Blades”, Page
21.
3. Inspect mower for loose, damaged or worn parts and
adjust or replace as needed.
4. Lubricate as noted in “Section 4: Maintenance and
Lubrication” on page 21.
5. Release tension on drive belt.
6. Move stroke control to disconnect position.
7. Store cutter bar in horizontal (operating) position.
8. Store Disc Mower inside if possible for longer Disc
Mower life.
9. Repaint parts where paint is worn or scratched to
prevent rust.
Disc Assembly
Figure 4-3
20797