


33
Section 4: Maintenance & Lubrication
2/27/07
Z44 & Z52 (S/N 472620 -526170) Zero Turning Radius Mowers Riding Mowers Accu-Z Razor
®
357-044M
Land Pride
Table of Contents
Engine Air Filter
Perform engine air filter maintenance per the engine
operator’s manual.
General Engine Maintenance
Detailed instructions and recommendations for break-in
and regular maintenance are specified in the engine
operator’s manual. Please refer to this manual for engine
servicing, lubricating oil levels with quality and viscosity
recommendations, bolt torques, etc. The engine
warranty is backed by the engine manufacturer. Special
attention should be paid to applicable data which is not
duplicated here.
Belt Replacement
Refer to Figure 4-10 and Figure 4-11:
Replace belts that show signs of severe cuts, tears,
excessive weather checking, cracking and/or burns.
Slight raveling of belt covering does not indicate belt
damage. Trim ravelings with a sharp knife.
Inspect belt pulley grooves and flanges for wear. A new
belt, or one in good condition, should never run against
the bottom of the groove. Replace pulley when this is the
case, otherwise belt will lose power and slip excessively.
Never pry a belt onto a pulley as this will cut or damage
the fibers of the belt covering. Keep oil and grease away
from belts, and never use belt dressings. Any of these
will destroy the belt composition in a very short time.
Deck Belt Replacement Instructions
Refer to Figure 4-10:
1. Park mower on a flat surface. Stop engine and
remove ignition key. Make sure blade engagement
switch is in the down (OFF) position. Spread
control levers fully apart and set park to (ON).
Disconnect negative battery cable.
2. Place deck height in the lowest position.
3. Remove the deck belt covers and floor panel.
4. Release the deck belt tension by putting a 3/4"
socket wrench on the over-center-release bolt (#9)
and turning counterclockwise. This will relieve the
tension on the deck belt idler spring.
5. Pull tension idler (#4) to the left of the machine to
provide maximum belt clearance.
6. Remove existing deck belt (#1).
7. Route new deck belt (#1) as shown in Figure 4-10.
8. Re-tension deck belt idler (#3) by turning the
over-center-release bolt (#9) clockwise. Check belt
tension per the “Deck Drive Belt Adjustment”on
page 22.
9. Re-install deck belt covers.
10. Re-attach the negative battery cable and floor panel.
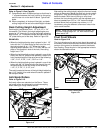
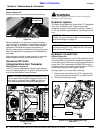
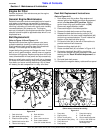
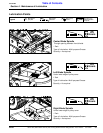
Deck Belt Drive Layout
Figure 4-10
6
2
4
2
6
2
5
1
8
7
23652
9
3
1. Deck drive belt
2. Deck blade spindle pulley
3. Electric clutch pulley
4. Spindle belt tension idler
5. Tension idler spring
6. Deck belt idler
7. Idler arm
8. Over-center tensioner
9. Over-center release
(Use 3/4" socket wrench)
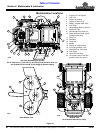
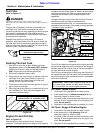
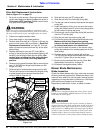
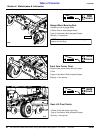
Drive Belt Viewed from the Bottom
(Drive motors removed for clarity)
Figure 4-11
4
6
8
5
1
23689
6
2
3
7
10
9
1. Pump belt
2. Engine pulley
3. Electric clutch pulley
4. Pump tension idler pulley
5. Pump idler arm
6. Pump pulley
7. Pump idler spring
8. Fixed idler pulley
9. Clutch restraint bracket
10. 1/4"-20 x 5/8" GR5 Hex
flange screws and
hex flange nuts