


32
Section 4: Maintenance & Lubrication
Z44 & Z52 (S/N 472620 -526170) Zero Turning Radius Mowers Riding Mowers Accu-Z Razor
®
357-044M
2/27/07
Land Pride
Table of Contents
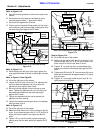
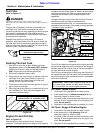
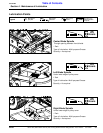
Fuel Filter
Refer to Figure 4-7:
!
DANGER
Close fuel shut-off valve before replacing fuel filter.
Otherwise, fuel can leak out creating a fire and/or explosion
hazard.
The fuel filter is installed in the fuel line between the
Left/Right Fuel Tank Valve and engine fuel pump.
Location of fuel filter will vary depending on which engine
your mower is equipped with. See engine owner’s
manuals for exact location of fuel filter and instructions
on removal and installation.
Replace filter annually or after every 100 hours of
operation, whichever occurs first. Be sure to Install the
fuel filter with Flow Arrow pointing towards the engine
side of the fuel line. Always check fuel line hoses for any
cracks or leaks. Replace as needed.
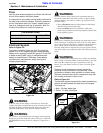
Fuel Filter
Figure 4-7
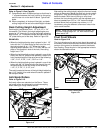
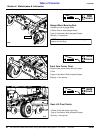
Draining The Fuel Tank
1. Park the unit on a flat surface. Make sure blade
engagement switch is in the down (OFF) position.
Place control levers in park and set park lever to
(ON). Stop engine and remove ignition key.
2. Disconnect negative battery cable.
3. Trace the fuel line from the tank to the tee under the
Left/Right Fuel Tank Valve (Refer to Figure 4-8.
Loosen the fuel line hose clamp at the tee and
remove the fuel line from the tee.
4. Place the end of the fuel line into a gas can or a drain
pan to drain the fuel tank.
5. When the fuel tank is drained, re-route the fuel line to
the Left/Right Fuel Tank Valve and reattach with
previously removed clamp.
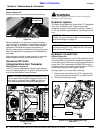
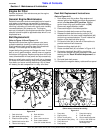
Fuel Shut-Off Valve (Honda Engine Location Shown)
Figure 4-8
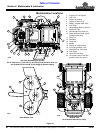
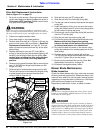
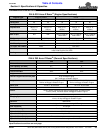
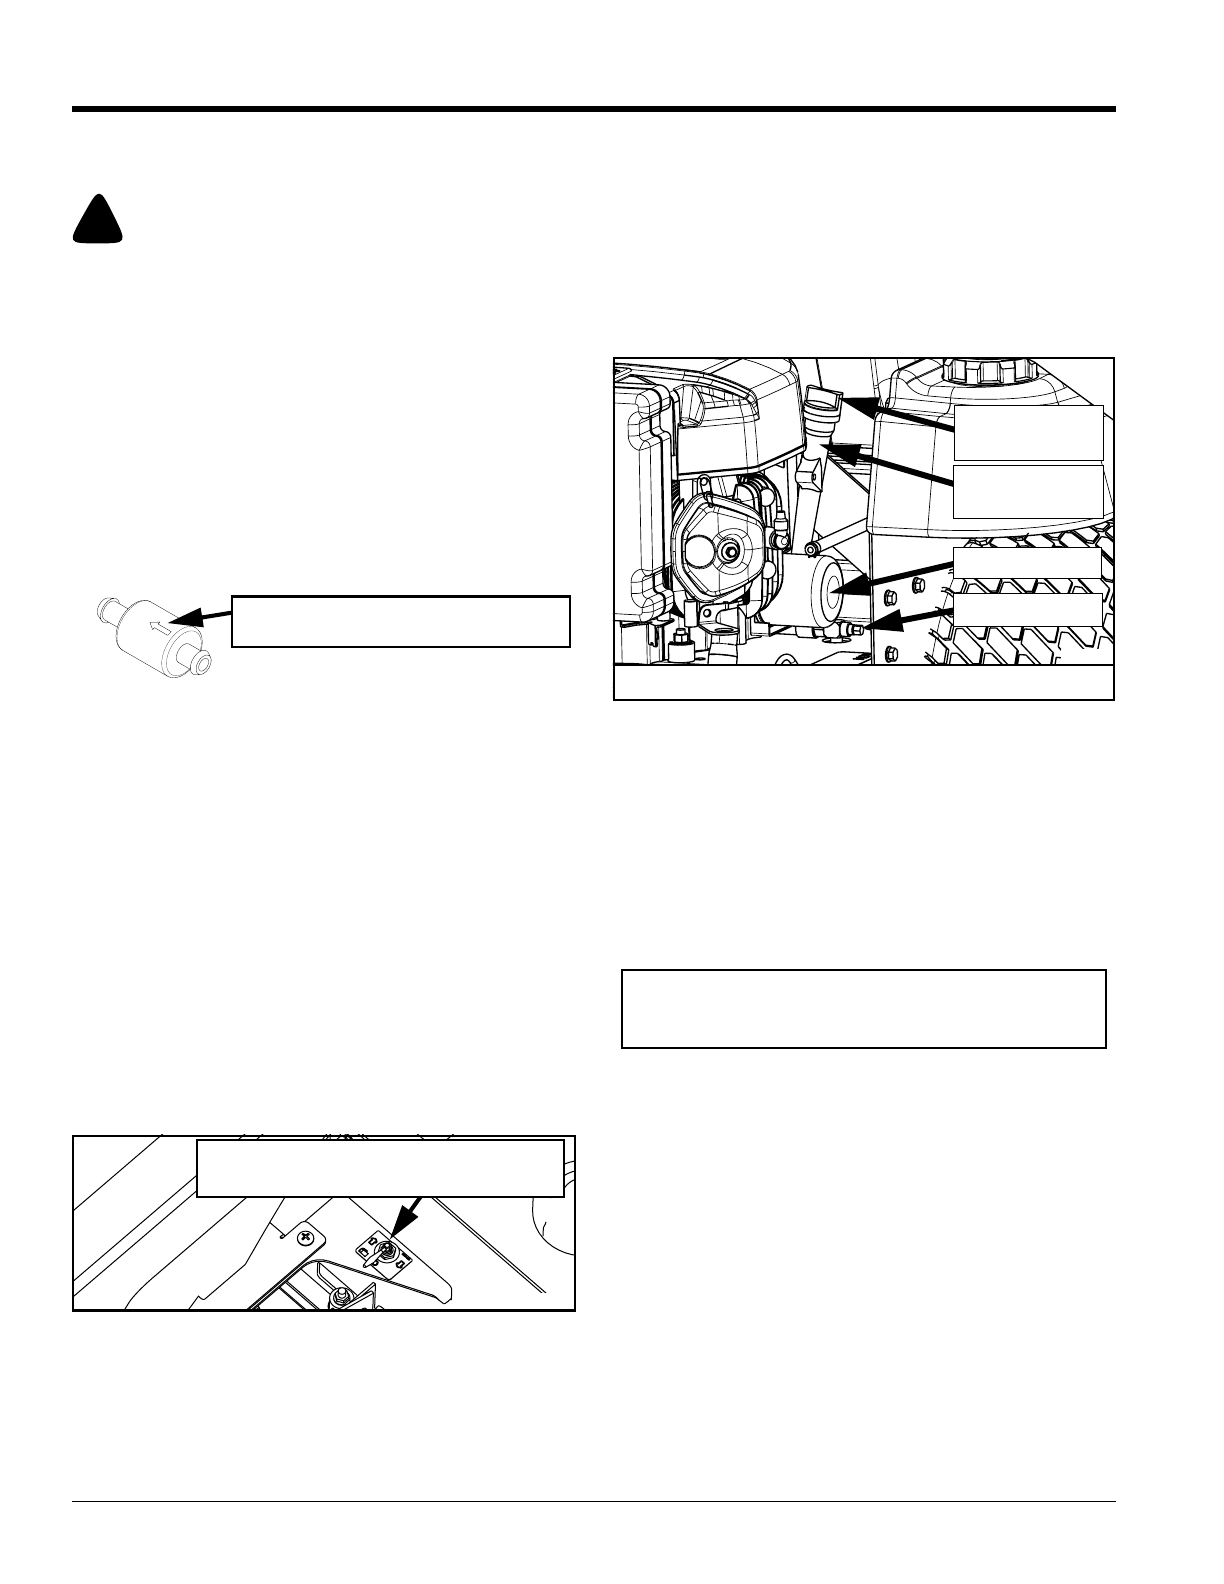
Engine Oil and Oil Filter
Refer to Figure 4-9:
Check engine oil daily and after every 4 hours of
operation. Crankcase dipstick and engine oil fill tube are
23803
Flow Arrow Indicates direction fuel
must flow through the filter.
23688
Left/Right Fuel Tank Valve
Center Position “O” as Shown is OFF
located at the rear of the machine. Mower must be sitting
level when checking oil. Refer to engine manual and
maintenance schedule for oil recommendation and
capacities.
Change the engine oil and filter after the first 5 hours of
operation and per the engine manufacturer’s
recommendations after that. It is recommended oil be
changed more frequently if the mower is being operated
in extremely dirty conditions.
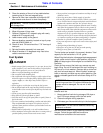
Oil Filter, Drain & Filler Tube (Honda Engine Shown)
Figure 4-9
The oil fill and dipstick are located on the right hand side
for the Honda engine and left hand side for the Briggs &
Stratton engine.The oil drain and oil filter are located on
the right hand side for both engines.
Drain oil by unscrewing the oil drain plug (see Figure 4-9)
as needed to allow oil to flow freely. Do not remove drain
plug. Drain plug will offer resistance once it is unscrewed
as far as it should be.
Oil Check, Honda Engine
1. Unscrew oil filler cap/dipstick and wipe it clean.
2. Insert dipstick fully in without screwing it in and
removing it again to check oil level.
3. If oil level is near or below the lower limit mark on the
dipstick, fill with recommended oil to the upper limit
mark. Do not overfill.
4. Reinstall oil filler cap/dipstick by screwing it in firmly.
Oil Check, Briggs & Stratton Engine
1. Unscrew oil filler cap/dipstick and wipe it clean.
2. Insert dipstick fully in by screwing it in and
removing it again to check oil level.
3. If oil level is near or below the lower limit mark on the
dipstick, fill with recommended oil to the upper limit
mark. Do not overfill.
4. Reinstall oil filler cap/dipstick by screwing it in firmly.
Engine Oil
Filler Tube
Crankcase
Dipstick
Oil Filter
Oil Drain Plug
23631
Bumper Removed for Clarity
IMPORTANT: Make certain engine is level and you
are inserting the dipstick correctly when checking
oil. An oil overfill can cause engine problems.