


16 Owner Service
WPMAN0142 (Rev. 9/1/2004)
BLADE SERVICING
Your dealer can supply genuine replacement
blades. Substitute blades may not meet original
equipment specifications and may be dangerous.
Make certain all movement of equipment com-
ponents has stopped before approaching for ser-
vice.
Low suction and general purpose suction blades are
available. Use low suction blades in sandy areas where
abrasive action could cause excessive blade wear.
General purpose suction blades are recommended for
all other applications.
Inspect blades before operation for condition and
ensure they are securely fastened. Replace blades that
are bent, excessively nicked, worn or have any other
damage. Small nicks may be ground out when sharp-
ening.
Replace blades on a spindle in pairs; an old blade and
a new blade may vary excessively in weight and cause
vibration. Never mix blade types.
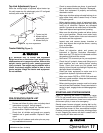
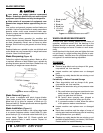
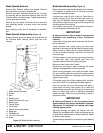
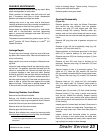
Blade Sharpening (Figure 10)
Follow the original sharpening pattern. Make an effort
to maintain balance on both blades from a spindle by
grinding the same amount from them. Blades that vary
excessively in weight can cause vibration.
Figure 10. Blade Sharpening
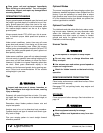
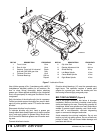
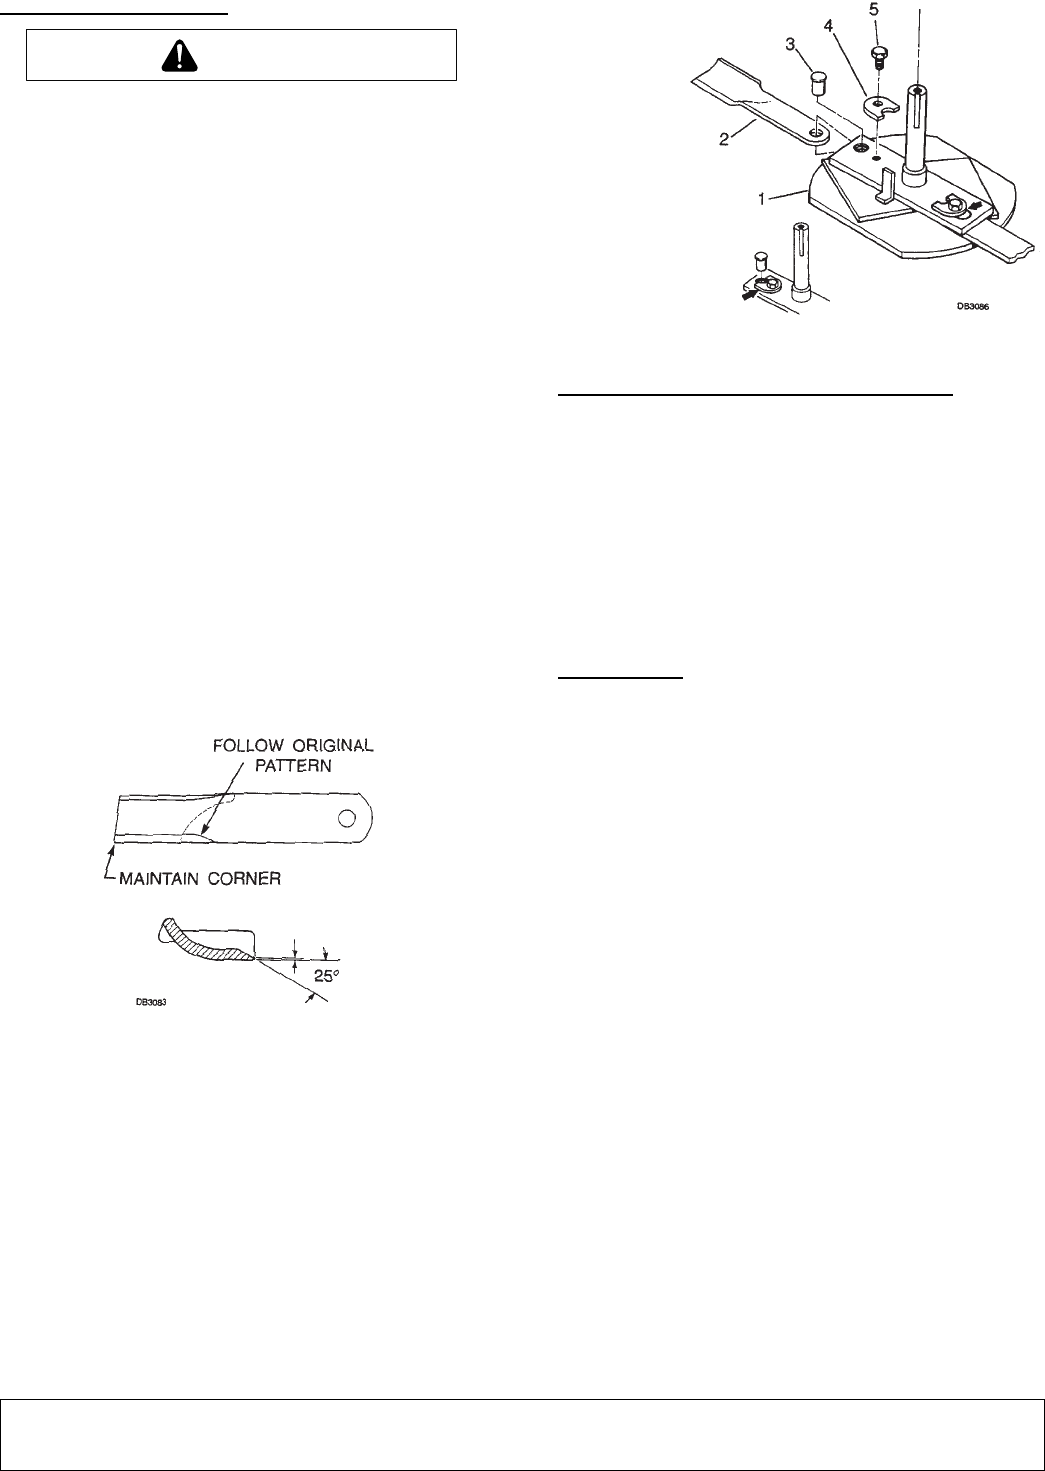
Blade Removal (Figure 11)
This mower is equipped with quick change blades.
Open blade access cover, loosen bolt (5) and rotate
blade lock (4) to allow for removal of blade pin (3).
Remove blade (2). Rotate spindle and remove opposite
blade in same manner.
Blade Installation (Figure 11)
Make sure to position blade so the cutting edge leads
in a counter-clockwise rotation. Install blade (2), then
place blade pin (3) in hole and rotate blade lock (4) to
secure blade. Tighten bolt (5). Rotate spindle and
install opposite blade in same manner. Repeat for
remaining spindles.
Figure 11. Blade Installation and Lock
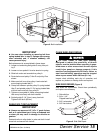
WHEEL BEARING MAINTENANCE
At least once each mowing season or 250 hours of
operation, whichever occurs first, the bearings in the
tailwheel should be removed, cleaned and repacked.
Replace bearings and cones if broken or worn exces-
sively.
Install the wheel in the wheel yoke and tighten the inner
nut until there is a slight bearing drag (similar to auto-
mobile wheels). Hold the inner nut and tighten the lock-
nut against it to maintain bearing adjustment.
CLEANING
After Each Use
● Remove large debris such as clumps of dirt, grass,
crop residue, etc. from machine.
● Inspect machine and replace worn or damaged
parts.
● Replace any safety decals that are missing or not
readable.
Periodically or Before Extended Storage
● Clean large debris such as clumps of dirt, grass,
crop residue, etc. from machine.
● Remove the remainder using a low-pressure water
spray.
1. Be careful when spraying near scratched or torn
safety decals or near edges of decals as water
spray can peel decal off surface.
2. Be careful when spraying near chipped or
scratched paint as water spray can lift paint.
3. If a pressure washer is used, follow the advice
of the pressure washer manufacturer.
● Inspect machine and replace worn or damaged
parts.
● Sand down scratches and the edges of areas of
missing paint and coat with spray paint of matching
color (purchase from your dealer).
● Replace any safety decals that are missing or not
readable (supplied free by your dealer). See Safety
Decals section for location drawing.
CAUTION
1/16" (2 mm)
1. Blade spindle
2. Blade
3. Blade pin
4. Blade lock
5. 1/2 x 3/4"
Nylok bolt