


6
SECTION II. ASSEMBLY
A. TRACTOR PREPARATION.
WARNING
Disengage the PTO, engage the brake lock,
and stop the tractor engine before performing
any preparation procedures. Place the tractor
on a firm and level surface before beginning
installation procedures.
WARNING
The exhaust system and surrounding areas are
HOT. To avoid personal injury, allow the tractor
to cool before beginning any blade installation
procedures.
NOTE
Remove the mower deck and front lift rod
assembly, or any other attachment from the
tractor.
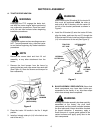
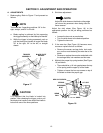
1. Remove the front bumper from the frame by
removing the hex wash. tapp screw from each side
(See Figure 2). Store the screws and bumper for
later reassembly.
Figure 2
2. Place the tractor lift handle in the No. 2 height
position
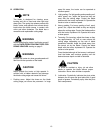
3. Install an internal cotter pin (14) in the hole at one
end of the rod (7).
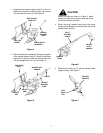
WARNING
When installing the lift bracket (8), the tractor lift
links must be positioned within the slots at
each side of the lift bracket, with the center lift
rod tab of the bracket positioned as shown in
Figure 3.
4. Install the lift bracket (8) onto the tractor lift links,
align the holes, and insert the rod (7) through the
lift bracket and lift links. Install an internal cotter pin
(14) in the other end of the rod (See Figure 3).
Figure 3
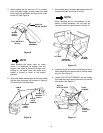
B. BLADE ASSEMBLY PREPARATION. Some front
blade components may have been further pre-
assembled at the factory. If so, skip those steps
which have already been completed.
WARNING
Although the blade assembly has been partially
assembled at the factory, the pivot latch
components and the contact surfaces between
the pivot plate and A-frame should be checked
for proper lubrication. If necessary, apply a
liberal amount of a good grade grease to the
contact surfaces and apply spray lube to the
latch components.
FRONT
BUMPER
HEX WASH. HD.
TAPP SCREW
(BOTH SIDES)
LIFT BRACKET
SLOTS
LIFT
BRACKET
TRACTOR
LIFT LINK
ROD
INTERNAL
COTTER PIN
LIFT ROD
TAB
CENTER