6
ASSEMBLY INSTRUCTIONS
TOOLS REQUIRED FOR ASSEMBLY
(2)3/4"Wrench
(2)9/16"Wrench
(2)1/2"Wrench
(2)7/16"Wrench
(1) Screwdriver
(1) Pliers
Spray adhesive is recommended for easier
assembly!
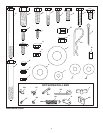
1. Removethehardwarepackandallloosepartsfromthe
carton.Besurethecartonisemptybeforediscarding.
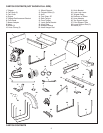
2. Lay out all the parts as shown in the carton contents.
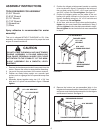
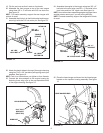
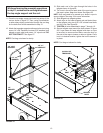
3. Position cart body halves upright on a smooth level
surfacesuchasagarageoororapaveddriveway.See
gure1.
4. Assemble halves together using two 1/4" x 3/4" hex
boltsand1/4"nylocknutsasshowningure1.Do not
tighten.
1/4" x 3/4" HEX BOLT
1/4" NYLOCK NUT
FIGURE 1
DO NOT LEAVE THE MOW-N-VAC UNATTENDED
DURING ASSEMBLY. A FALLING MOW-N-VAC
CAN CAUSE PERSONAL INJURY! PAY CLOSE
ATTENTION TO THE STABILITY OF THE MOW-
N-VAC. ASSEMBLE ON A SMOOTH, LEVEL
SURFACE.
CAUTION
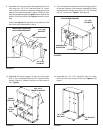
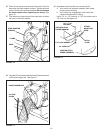
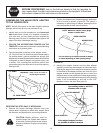
5. Positionthetailgatereinforcementbracketonoutside
ofcartasshowningure2.Assembletothebottomof
the cart body using four 5/16" x 3/4" truss head bolts
and5/16"nylocknuts.Do not tighten. Seegure2.
6. Position the tailgate guides on the inside of the cart
bodies with guide channels to the front as shown in
gure2.Assembleusingfour1/4"x3/4"hexboltsand
1/4"nylocknuts.Do not tighten.
7. At this time, with the cart body halves pulled together,
tighten the four truss head bolts assembled in step 5
and then tighten the four hex bolts assembled in step 6.
Do not tighten the two hex bolts that were assembled
in step 4.
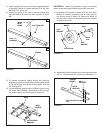
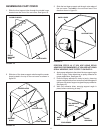
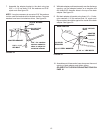
8. Remove the bottom two pre-assembled bolts in the
tailgatereinforcementbracket.Assemblea5/16"washer
and spacer onto the bolt and reassemble it to the tailgate
reinforcementbracket.Seegure3.
1/4" x 3/4"
HEX BOLT
5/16" x 3/4"
TRUSS HEAD BOLT
5/16" NYLOCK NUT
1/4" NYLOCK NUT
TAILGATE
REINFORCEMENT
BRACKET
TAILGATE GUIDE
FIGURE 2
FIGURE 3
This unitis shippedWITHOUT GASOLINEorOIL. After
assembly, see separate engine manual for proper fuel and
engine oil recommendations.
PRE-ASSEMBLED BOLT
5/16" WASHER
SPACER
TAILGATE REINFORCEMENT BRACKET


