27
SE12
English
4. SET UP
■칼날의 조립
●엔진을 시동한 상태로, 칼날의 설치
나 제거는 하지 말아 주십시오.
●교환용 칼날 및 칼날설치 공구류는
메이커의 순정품을 사용해 주십시
오.
●금속칼의 착탈시는, 부상 방지를 위
해서 튼튼한 장갑을 착용해 주십시
오.
●칼날은 기어케이스측에서 볼 때, 왼
쪽회전(반시계방향)합니다. 안팎이
있는 칼날을 사용할 때에는, 칼의
방향을 확인한 후 설치해 주십시오.
금속칼날 장착방법
1.기어 샤프트에 가조임되어 있는 칼
날장착볼트(왼나사이므로 오른쪽으
로 돌리면 풀립니다)와 칼날누름쇠
를 분리하여 주십시오.
2.칼날을 글씨가 있는 면을 기어 케
이스측으로 하여 칼날받침쇠에 올
려놓고, 칼날의 구멍을 칼날받침쇠
의 凸부에 바르게 끼워 주십시오.
3.칼날누름쇠를 凸면을 칼날측으로
하여 기어 샤프트에 끼워 주십시오.
4.부속된 볼트커버를 칼날누름쇠에
올려놓고, 부속된 L형 둥근봉으로
고정시킨 후, 칼날장착볼트(왼나사)
에 스프링와셔를 끼우고 단단히 조
여 주십시오.
【조임 토크】
14.7~19.6N·m(150~200kgf-
cm)
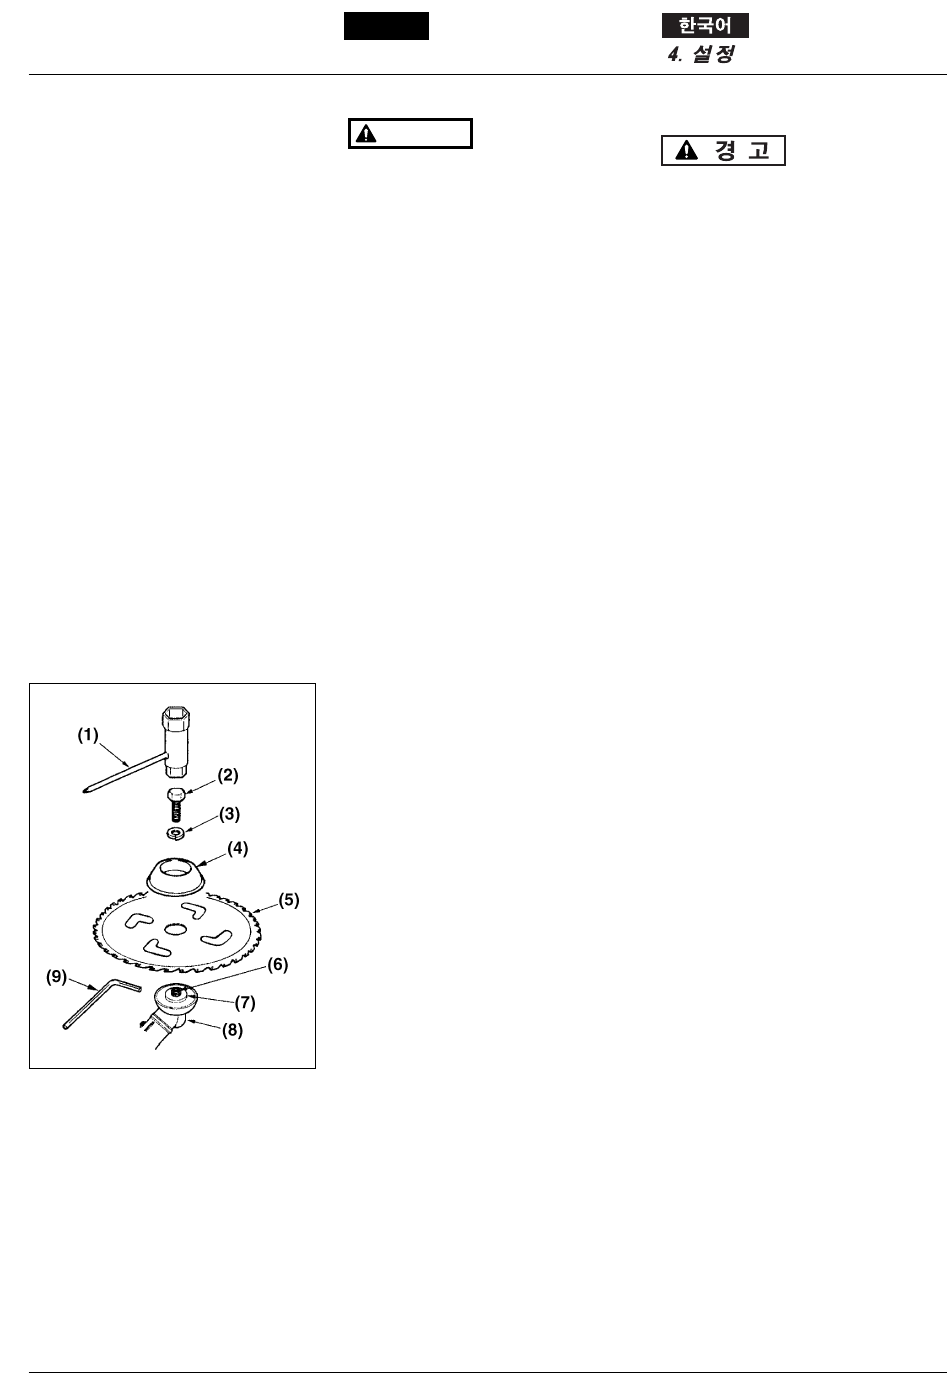
(1)소켓 렌치
(2)칼날장착볼트
(3)스프링 와셔
(4)칼날누름쇠
(5)칼날
(6)기어 샤프트
(7)칼날받침쇠
(8)기어케이스
(9)육각렌치
■ INSTALLING THE BLADE
• Do not install or remove the
blade while the engine is in
operation.
• Use ZENOAH’s genuine
replacement blades and metal
fixtures when installing the
blade.
• When installing or removing the
blade, fix the machine securely,
and wear robust gloves.
•The blade turns
counterclockwise (viewed from
the gear case). When using an
inside-out blade, check the
direction of the blade before
installing it. In particular, if you
install a chip saw in the wrong
direction, the chips might break
and scatter.
INSTALLING THE METAL BLADE
1. Remove the blade mounting bolt
which is temporarily fastened in
the gear shaft (and which can be
loosened by turning it clockwise as
it is a left-handed bolt) and the
outer holder.
2. Put the blade on the blade rest
plate with the blade surface on
which there is writing facing
toward the gear case, then fit the
hole of the blade to the projecting
part of the blade rest plate
correctly.
3. Put the outer holder into the gear
shaft with its convex surface facing
toward the blade.
4. Put the bolt cover on the outer
holder, stop the whirl of the blade
rest plate with the L-shaped round
rod, and put the spring washer into
the blade mounting bolt (left-
handed bolt). Then, tighten the
bolt firmly.
[Tightening torque]
14.7 to 19.6 N-m (150 to 200 kgf-cm)
(1) Socket wrench
(2) Blade mounting bolt
(3) Spring washer
(4) Outer holder
(5) Blade
(6) Gear shaft
(7) Receiving plate
WARNING


