19
English
4. SET UP
■ CHARGING OF THE BATTERY
BY CHARGER
1. Insert the battery tightly into the
charger.
If you insert the battery at an angle,
the terminal portion might become
damaged.
2. Insert the jack of the AC adapter
into the charger.
3. Insert the power-supply plug of the
AC adapter into your household
socket (AC220 V). The “Power
supply/POWER” and
“Charging/CHARGE” lamps will
turn on (red).
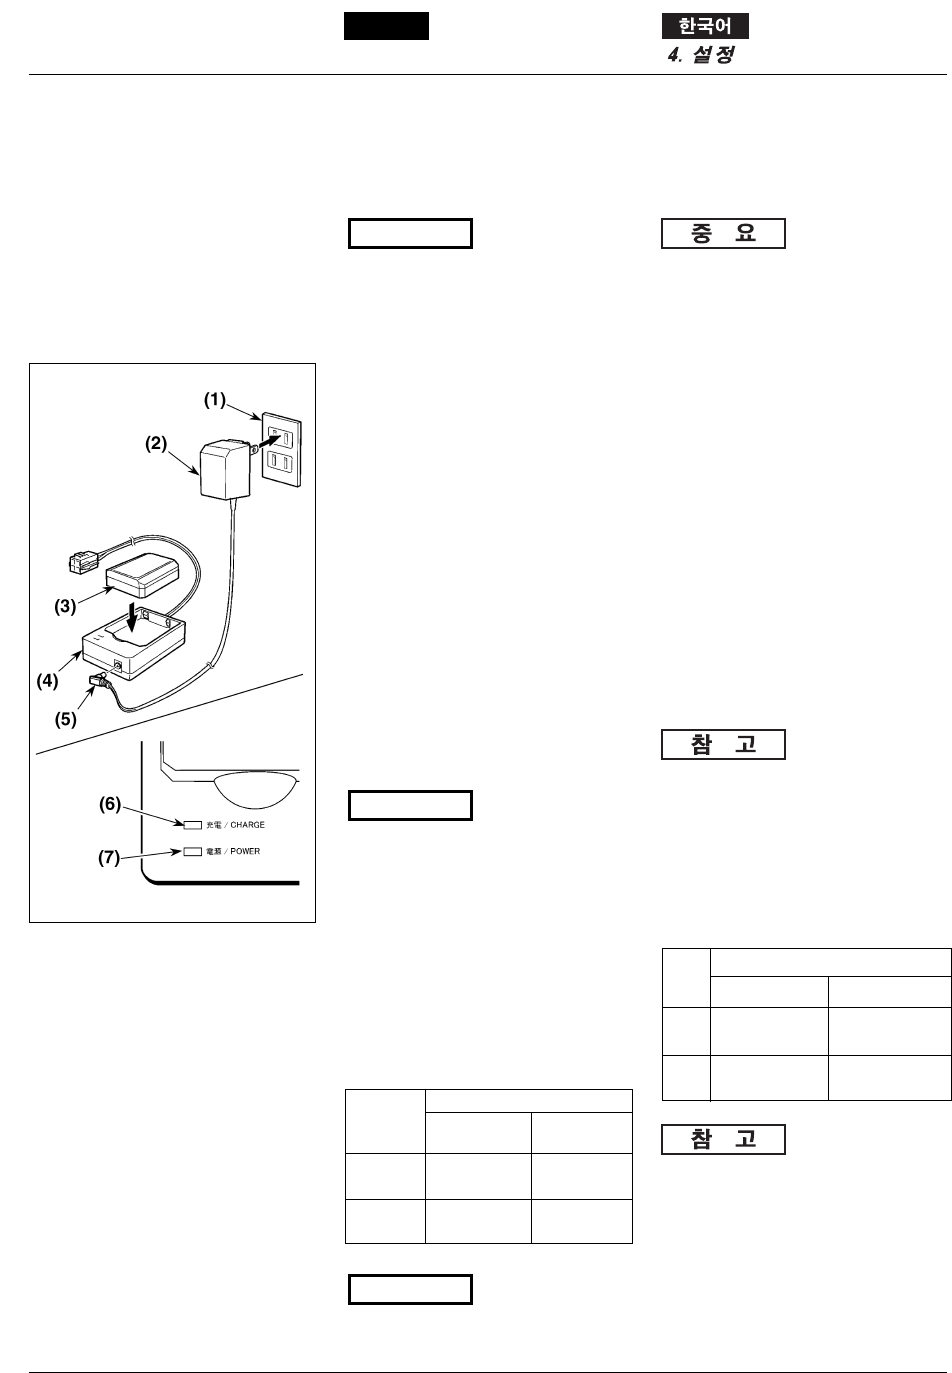
(1) Socket (AC220 V)
(2) AC adapter
(3) Battery
(4) Charger
(5) Jack
(6) Charging/CHARGE
From turning on (red) to
turning off
(7) Power supply/POWER
Turning on (red)
Be sure to charge the battery at least
2 m away from any audiovisual
equipment such as a television or
radio to prevent any noise
interference with the AC adapter.
[Confirming charging]
The “Charging/CHARGE” indicator
lamp changes according to the
charging status. When charging is
completed, the lamp turns off.
The battery takes about four hours to
charge from empty to fully charged.
NOTE
NOTE
IMPORTANT
SE1
Charging
status
Under
charging
Charging is
completed
Lamp indication
Power supply/
POWER
Turned on (red)
Turned on (red)
Charging/
CHARGE
Turned on (red)
Turned off
■충전기에 의한 충전
1.충전기에 밧데리를 확실하게 끼워
주십시오.
밧데리를 비스듬하게 끼우면 단자부
분이 손상될 경우가 있습니다.
2.AC어뎁터의 잭을 충전기에 꽂아
주십시오.
3.AC어뎁터의 전원 플러그를 각 가
정의 콘센트(AC220V)에 꽂아 주
십시오. 「전원/POWER」 및 「충
전/CHARGE」램프가 점등(적색)
합니다.
(1) 콘센트(AC220V)
(2) AC어뎁터
(3) 밧데리
(4) 충전기
(5) 잭
(6) 충전/CHARGE
점등(적색)에서 소등
(7) 전원/POWER
점등(적색)
잡음이 생길 수 있으므로 텔레비젼이
나 라디오 등의 AV기기에서 2m이상
떨어진 곳에서 충전해 주십시오.
[충전의 확인]
「충전/CHARGE」램프는 밧데리의
충전상태에 따라 표시가 바뀝니다. 램
프가 꺼지면 충전완료입니다.
밧데리가 방전상태에서 충전완료되기
까지 걸리는 시간은 약 4시간입니다.
점등(적색) 점등(적색)
충전
상태
램프표시
전원/POWER 충전/CHARGE
충전
중
충전
완료
점등(적색) 소등


