


28
13
MAINTENANCE INSTRUCTIONS (continued)
SAFETY INSTRUCTIONS (continued)
After servicing, be sure all tools, parts and service equipment are removed.
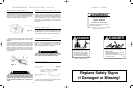
Check to ensure all safety signs are installed and in good condition. (See safety sign section for location
drawing.)
Do not allow grease or oil to build up on any deck or platform.
Never replace hex bolts with less than grade five bolts unless otherwise specified, i.e. shear bolts. Refer to
bolt torque chart for head identification marking.
Where replacement parts are necessary for periodic maintenance and servicing, genuine factory replacement
parts must be used to restore your equipment to original specifications. The manufacturer will not claim
responsibility for use of unapproved parts and/or accessories and other damages as a result of their use.
If equipment has been altered in any way from original design, the manufacturer does not accept any liability
for injury or warranty.
A fire extinguisher and first aid kit should be kept readily accessible while performing maintenance on this
equipment.
Following operation, or when unhooking, stop the tractor, set the brakes, disengage the PTO, shut off the
engine and remove the ignition keys.
Store the unit in an area away from human activity.
Do not park equipment where it will be exposed to livestock for long periods of time. Damage and livestock
injury could result.
Do not permit children to play on or around the stored unit.
Make sure all parked machines are on a hard, level surface and engage all safety devices.
If blocking is used, make sure it is solid and secure before leaving area.
MAINTENANCE SAFETY (continued)
STORAGE SAFETY
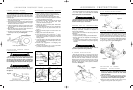
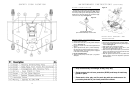
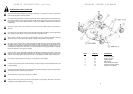
BLADE SPINDLE SERVICE
INSTRUCTIONS ASSEMBLY
1. Inspect all parts for damage or wear and make sure
that the bearings are in good condition. Replace any
parts that show wear or any damage.
2. Clean all components and make sure that they are
free of dirt, grease or any other contaminants.
3. Before assembly pack the ball bearings with quality
bearing grease.
4. Press a bearing into the housing on the side that has
the grease overfill hole. Make sure that the bearing’s
dirt seal is facing to the outside of the housing.
5. Install a flat washer (item 6), and the dust cap (item
4). Next press the spindle shaft through the already
installed bearing and be certain that the bearing is
seated properly.
6. Install the spacer (item 5) on the spindle shaft. Press
the second bearing into the opposite side of the
housing and make sure that it is properly seated, with
the dirt seal facing outside.
7. Next install the flat washer (item 6) and key (item 10)
on the shaft. Mount the proper sheave that corre-
sponds with the spindle.
8. Install lockwasher (item 7) and nut (item 8) on the
shaft and tighten to approximately 65 ft. lb. torque.
9. Align the slot in the nut with the lockwasher tab.
Bend the tab into the nut so it locks in place.
10. Grease the spindle assembly through the grease fit-
ting (item 9) until a small amount of grease comes
out of the relief hole in the housing.
STORAGE
Your mower represents an investment from which you
should get the greatest possible benefit and use.
Therefore, when the cutting season is over, the mower
should be thoroughly checked and prepared for storage
so that a minimum amount of work will be required to put
it back into operation for the next season.
We suggest the following storage procedures:
1. Thoroughly clean the mower
2. Lubricate the mower as recommended in the mainte-
nance section of this manual.
3. Tighten all bolts and pins to the recommended torque.
4. Check the mower for worn or damaged parts and
replace any require so.
5. Store the mower in a clean, dry place with the deck
resting on blocks.
6. Use spray touch up enamel where necessary to pre-
vent rust and maintain its appearance.
28 / 13 - FM001 12/6/00 3:39 PM Page 1