


20
21
OPERATION INSTRUCTIONS (continued)
CUTTING HEIGHT ADJUSTMENT
Important: Avoid very low cutting heights.Striking the
ground with the blades gives the most damaging shock
loads a mower can encounter and will cause damage to
it and the driveline.
1. Using the tractor, raise the mower off the ground and
place supports underneath of it, so that it will not drift
downwards while making adjustments or mainte-
nance.
2. While supporting the wheel and yoke assembly off the
ground, remove the snapper pin from the top of the
gauge wheel spindle. Position the supplied spacers
as required for achieving the desired cutting height.
TRACTOR PREPAR ATION
Do not install mower on a tractor over 40 HP.
CUTTING SPEED
Proper ground speed for cutting will depend upon the
height, type, and density of the grass to be cut.
Normally, ground speed will range from 1.5 to 3 MPH.
Tall dense grass should be cut at low speeds, while thin
medium height grass can be cut at faster ground speeds.
CUTTING TIPS
Always operate the PTO at the recommended RPM
when cutting. This is necessary for correct blade speed,
which creates a clean and even grass cut.
Under certain conditions the tractor tires may roll some
grass blades down and prevent them from being cut at
the same height as the surrounding area. If this occurs,
reduce the tractor ground speed, but maintain 540 RPM
PTO speed. The lower ground speed will allow grasses
to be at least partially rebound and cut. Taking a partial
cut and /or reversing the direction of travel may also pro-
duce a cleaner cut.
When people are passing by the area you are cutting,
stop the cutting until the area has been cleared.
Although the mower is shielded to prevent objects from
DETACHING AND STORING
Lower the mower to the ground. Park the tractor with
transmission in the correct gear (Automatic transmis-
sions should be set on Park; Standard transmissions
should be set on Neutral). Set the parking brake, turn off
the engine and remove the keys from the ignition. Wait
until the PTO stops rotating completely before dismount-
ing the tractor.
Disconnect the driveline from the tractor PTO and store
it to prevent contact from the ground and away from
excessive moisture.
Always reinstall or lower into position the tractor PTO
master shield. This shield should always remain in place
except when connecting or disconnecting the driveline.
BEFORE OPERATING OR
TRANSPORTING THE MOWER
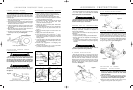
Always display the SMV (slow moving vehicle) symbol
on the rear of the tractor that transports the mower. The
SMV symbol should be clearly visible to vehicles over-
taking the tractor transporting the
mower. Prominent display of this
symbol will help the operator avoid
accidents which could cause injury or
possibly death. See figure 4.
being thrown by the blades, no shielding device is 100%
effective. The mower operator has greater knowledge of
the hazards created by the machine than people on the
street. Therefore, he must take every precaution possible
when other people are around.
Extremely tall grass should be cut in two stages. First,
raise the mower above the desired cutting height and cut
the grass in one direction. Second, adjust the mower to
the desired cutting height and cut in a perpendicular (90
degree) direction from the first cut.
Remember, sharp blades produce cleaner cuts and
require less power.
Before cutting analyze the area to determine the best
cutting procedure. One must consider the grass height,
its type and the terrain relief.
Grass is best cut when it is dry. Mowing wet grass can
cause plugging, which results in grass clumps behind the
mower.
The safe operation of this mower is the responsibil-
ity of the operator. The operator should be familiar with
the machine, tractor and all safety practices before start-
ing operation. This mower is designed for lawn and grass
mowing. It is not designed for rough conditions or heavy
weed mowing. The mower is equipped with suction type
blades, which are best suited for lawn mowing.
Always operate tractor at 540RPM.
This chapter provides information for attaching mower
to tractor and preparing it for field operation. Review this
data prior to tractor hookup and operation.
WHEEL TREADS
Tractor wheel tread spacing should be increased when
working on inclines or rough ground to reduce the possi-
bility of tipping.
STABILIZER BARS AND SWAY BLOCKS
Use stabilizer bars or sway blocks to prevent side sway
of the mower.
DRAWBAR
Shorten or remove the tractor drawbar so it will not
interfere with the up and down movement of the mower.
DRIVELINE ATTACHMENT TO TRACTOR
1. Grab and turn the collar on the end of the attaching
yoke.
2. Slide yoke with the collar turned onto the tractor PTO
shaft.
3. Move yoke back and forth until its locking pin has
engaged on the PTO shaft groove.
ATTACHING THE MOWER TO TRACTOR
(LIFT TYPE ONLY)
This mower is designed for tractors with 540 RPM and
category I hitch. Back the tractor up to the mower so that
the lower draft arms are in alignment with the mower lift
pins. Stop the engine, lock the brakes or place the trac-
tor in park. Connect the tractor and stabilizer bars to the
lower lift pins. Adjust the top link so it will pin to the top
holes in the A-Frame or into holes in floating top link.
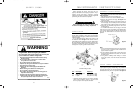
W ARNING!
Do not operate tractor with less than 20% of it’s
gross unballasted mass on the front wheels with the
mower in the transport position.
W ARNING!
When attaching the driveline yoke to the tractor
PTO shaft, it is important that the spring activated
locking collar turns freely and that it seats properly
in the tractor PTO shaft groove.
W ARNING!
Avoid personal injury! When attempting to stop a
tractor which does not have a live PTO, the momentum
created by the blades of a mower can cause the trac-
tor to be pushed forward. Do not operate this mower
unless the tractor has a live or independent PTO.
W ARNING!
Avoid personal injury! Pick up all rocks and other
debris before cutting. Enter new cutting areas care-
fully. Cut material higher the first time to allow the
mower to clear unseen or hidden objects. Never
assume that a cutting area is clear. Always check
carefully before entering it.
W ARNING!
Avoid personal injury! Be sure tractor engine is off,
that key is removed from ignition and allow blades to
completely stop turning before dismounting to make
adjustments.
W ARNING!
Do not get between tractor and mower when the
engine is running.
DANGER!
Never allow children to operate, ride or come close
to the mower or tractor. Usually, 15-16 year old chil-
dren who are mature and responsible can operate
the mower with reasonable safety if they have read
the operator’s manual, been trained in safe operation
of the machine, and are physically large and strong
enough to reach and operate the controls easily.
OPERATION INSTRUCTIONS
STA RTING AND STOPPING MOWER
The power required for operating the mower is supplied
via the tractor PTO. Refer to your tractor’s manual for
instructions on engaging and disengaging the PTO.
1. Always engage the PTO at low engine RPM.
2. Operate the mower at 540 RPM PTO speed. Do not
exceed 540 RPM PTO speed.
3. In case of emergency, you must learn how stop the
tractor and mower quickly.
Important: Stop cutter and tractor immediately upon
striking an obstruction. Inspect the mower and repair any
damage before resuming operation. Do not disengage
PTO when the engine is at full PTO RPM. Always bring the
tractor engine to idle speed before disengaging the PTO.
To start operation, reduce engine speed and engage the
tractor PTO. Before starting to cut, gradually increase the
engine speed to develop full PTO speed.
Enter the area to be cut with the cutter operating at PTO
speed and, if it becomes necessary to temporarily regu-
late engine speed during operation, increase or decrease
the speed gradually.
To transport the mower, disengage the PTO and raise
to full transport height.
Figure 4
20 / 21 - FM001 12/6/00 3:25 PM Page 1