


Operation 11
51642 (Rev. 11/9/2007)
Without Optional Casters
With lift height set and mower leveled, lower mower to
desired cutting height and set lower lift control stop.
This allows the mower to be raised when necessary,
then lowered back to a pre-set cutting height.
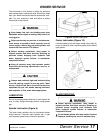
With Optional Casters
Caster adjustment is accomplished by placing axle in
upper or lower hole in yoke, or by moving spacers to
top or bottom of pivot shaft. With lift height set and
mower leveled, lower mower on caster wheels at
desired cutting height and set lower lift control stop.
Proper setting of the lower lift stop will prevent chain
from contacting belt and other mower components.
Excess chain can be cut off after final adjustment is
made.
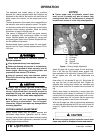
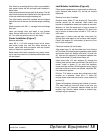
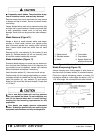
Figure 2. Chain Clearance from Drive Belt
NOTICE
■ Whenever adjustments are made with casters,
carefully raise mower to ensure casters do not
come in contact with any part of tractor. Should any
interference occur, readjust lift chains.
■ Be sure lift chains do not interfere with drive
belt (see Figure 2).
■ Always raise mower off casters when backing
and turning at the same time to prevent casters
from locking up on front tractor tires.
SIDE SKID ADJUSTMENT
With cutting height set, adjust side skids to within 1/2"
of the ground. Side skids should be adjusted 1/2"
higher than casters when they are used to set cutting
height. Never operate mower with weight on both
skids. Properly adjusted side skids are designed to
carry mower over uneven ground and minimize scalp-
ing.
MOWER ATTITUDE
Position front of mower level with, or slightly below, the
rear to provide closer cutting. Mowing with the front
end high will produce ragged cuts with a scalloped
look, excessive shredding, and will require extra power.
Attitude will be adjusted with the rear end low when
using the leaf mulcher. See instructions on page 27 for
attitude adjustment.
PRE-OPERATION CHECK LIST
(OWNER's RESPONSIBILITY)
___ Review and follow safety rules and safety decals
on page 5 through page 9.
___ Check that all safety decals are installed and in
good condition. Replace if needed.
___ Check that all shields and guards are properly
installed and in good condition. Replace if
needed.
___ Check that all hardware is properly installed and
secured.
___ Mower vibration tends to loosen bolts during
operation. All hardware should be checked regu-
larly to maintain proper torque. It is a good prac-
tice to check mower before each operation to
ensure all bolts are secure.
___ Check to ensure blades are sharp and secure
and cutting edge is positioned to lead in a
counter-clockwise rotation.
___ Check that equipment is properly and securely
attached to tractor.
___ Inspect area and remove stones, branches or
other hard objects that might be thrown, causing
injury or damage.
___ Do not allow riders.
___ Lubricate all grease fitting locations.
___ Set tractor PTO at 1000 rpm.
___ Make sure tractor ROPS and seat belt are in
good condition. Keep seat belt securely fastened
during operation.
___ Check cutting height and attitude adjustment.
___ Place tractor PTO and transmission in neutral
before starting engine.
STARTING & STOPPING MOWER
■ Operate tractor PTO at 1000 rpm.
Power for operating the mower is supplied by the trac-
tor PTO. Refer to your tractor manual for instructions
on engaging and disengaging PTO. Always operate
PTO at 1000 rpm. Learn how to stop tractor and mower
quickly in case of an emergency.