


Maintenance Instructions REPLACING/REPAIRING
42
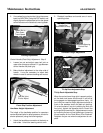
• An excessive amount of the flat section of the
blade has been ground away (removed) when the
blade is sharpened. Replace the blade when less
than a 3/4 in. (19 mm) flat section remains at the
blade tip.
• Examine ends of the blade carefully, especially
the intersection where the flat section of the blade
turns up to form the “wing tip” (refer to Mower Blade
Profile for Sharpening illustration in Sharpen
Mower Blades instructions). Since sand and abra-
sive material can wear metal away in this area, the
blade should be replaced when metal thickness
has worn to 1/16 in. (1.6 mm) or less.
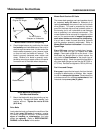
• Check the blades for straightness by marking
blade tip position inside the deck housing and then
rotating the opposite end of the blade to the same
position and comparing. If the difference in blade tip
track is more than 1/8 in. (3 mm), the blade is bent
and should be replaced.
• Inspect the blade surface, especially in formed
areas, for cracks. Replace the blade if any cracks
are found.
Reinstall the blades following procedure from
Sharpen Mower Blades instructions. If blades are
replaced, always use Walker original equipment
blades to ensure safety and optimum performance.
The quality and performance of replacement
blades offered by other manufacturers cannot be
guaranteed, they could be dangerous.
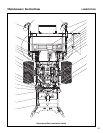
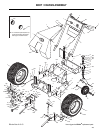
Mower Deck Gearbox Replacement
NOTE: Deck gearbox(es) may be changed with
the deck mounted on the tractor. However, the deck
may be removed from the tractor making the overall
job of removing the gearbox assembly easier. Refer
to Deck Installation in Assembly Instructions and re-
verse the procedure to remove the deck.
To replace the mower deck gearbox(es), use the fol-
lowing procedure:
1. Remove mower blades. Refer to procedure in
Sharpen Mower Blade instructions.
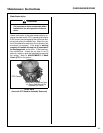
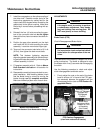
2. Remove gearbox cover (two machine screws)
and PTO shaft guard (two 1/4-20 bolts).
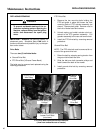
3. Remove two (2) 3/8-16 mounting bolts from
each blade drive gearbox and lift the entire
gearbox assembly from the deck (including
PTO drive shaft).
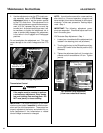
4. Remove the screws securing the cover plates
on the gearboxes and remove the covers. Re-
move all covers to be sure oil is completely
drained from all gearboxes.
NOTE: With oil flow throughout the unitized
gear drive assembly; if one gearbox has internal
damage or excessive wear, the remaining gear-
boxes and connector tubes should be complete-
ly disassembled and thoroughly flushed out with
solvent before reassembly.
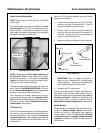
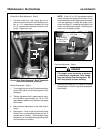
5. Drain and properly dispose of oil.
6. Remove the four (4) bolts mounting the gearbox
to the connector tube and slide the gearbox off
the splined drive shaft coupling.
DANGER
When blades are operated over sandy
soil, and if blades are allowed to wear, a
“slot” may be worn into the wing tip of
blade. Eventually a piece of the blade may
break off creating a serious potential for
injury or damage.
WARNING
DO NOT try to straighten a blade that is
bent. NEVER weld a broken or cracked
blade. ALWAYS replace with a new blade
to assure safety.
CAUTION
ALWAYS use genuine factory replacement
parts. Substitute parts CAN result in prod-
uct malfunction and possible injury to the
operator.