


Maintenance Instructions CLEANING
5
6
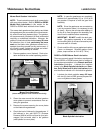
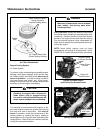
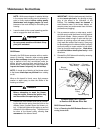
Kohler Air Cleaner (Secondary)
NOTE: The Kohler Air Cleaner should only be ser-
viced more often than a yearly interval if there are
indications that the Donaldson Radialseal (prima-
ry) has failed.
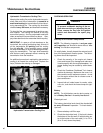
• Foam Precleaner
An oiled, foam precleaner surrounds the paper ele-
ment of the Kohler engine air cleaner system. Clean
and re-oil the foam precleaner yearly or more often
in dusty or dirty conditions.
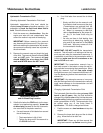
1. Unscrew the air cleaner cover mounting nut and
remove the air cleaner cover.
2. Remove the foam precleaner by sliding it off the
paper element.
IMPORTANT: Replace the foam precleaner if
necessary. Use ONLY Kohler replacement part
#24-083-02.
3. Wash the foam precleaner in warm water with
detergent. Rinse thoroughly and squeeze out
excess water (do not wring). Allow the preclean-
er to air dry.
4. Saturate the foam with clean engine oil.
Squeeze to distribute and remove excess oil.
5. Reinstall the precleaner by sliding it over the pa-
per element.
6. Reinstall the air cleaner cover and mounting nut.
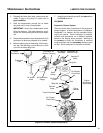
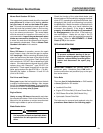
• Paper Element
The Kohler engine uses a dry, high density paper air
filter element. Check the element (located under the
foam precleaner) yearly or more often in dusty or
dirty conditions. Replace the element if it is dirty,
bent, or damaged.
IMPORTANT: Use ONLY Kohler part #47-083-03.
Aftermarket filters may not seal properly or filter ef-
ficiently.
IMPORTANT: Kohler does not recommend clean-
ing the paper element and reinstalling. DO NOT
wash the element or use pressurized air to clean as
this will damage the element. NEVER apply oil to
the paper element.
1. Unscrew the air cleaner cover mounting nut and
remove the air cleaner cover and rubber seal on
the air cleaner stud.
2. Remove the foam precleaner from the paper el-
ement. Replace if necessary.
3. Unscrew the element cover mounting nut and
remove the element cover and the paper ele-
ment.
4. Use a bright light and inspect the inside of the
element for dirt or damage. Check very careful-
ly for pin holes or other damage that will allow
dirt to leak through the paper. Replace the ele-
ment if necessary.
5. Check the condition and resilience of the ele-
ment gaskets. If the gaskets have hardened or
cracked or if there is evidence of a gasket not
seating evenly, replace the element.
6. Check the air cleaner base plate. Make sure it is
secure and not bent or damaged. Check the
condition of the rubber seal on the air cleaner
stud. Also, check the element cover for dam-
age. Replace any damaged components.
7. Reinstall the paper element, cover, mounting
nut, and foam precleaner. Tighten, but do not
overtighten, the mounting nut (tighten 1/2 to 1
turn after contacting the cover).
NOTE: A light coating of grease on the filter
gaskets is recommended to enhance sealing
and prevent dust leaks.
8. Check the security of the element. Make sure
the element is positioned properly and sealed
tightly against the air cleaner base plate and el-
ement cover.
9. Reinstall the rubber seal on the stud, the air
cleaner cover, and mounting nut.