


Section 2: Assembly
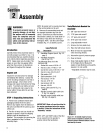
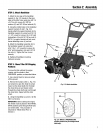
STEP4: Install ForwardClutch Cable
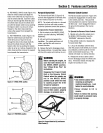
1. Placethe forward clutch cablebracket
(P,Fig. 2-4) on the handlebarsupport (A).
Attachthe cablebracketusing a 1/4"-20 x
1-1/4" hexhd. screw (R, Fig. 2-4) and
1/4"-20 hexIocknut (S).Tighten securely.
2. Carefullyunwrap theforward clutch
cable (thecablewithout a knobattachedto
it) from its shipping position and slide the
thin cablewire (T, Fig. 2-4) into the slot in
thecablebracket. Pushthe cableconnector
(U, Fig.2-4) upthrough the hole in the
bracketuntil the groove in the connector
snaps into placeon the bracket.
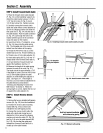
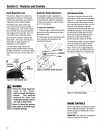
8. Insertthe #10-24 x 2" slotted hd. screw
(V,Fig. 2-5) down intothe cablespring
(W). Thethreaded end of thescrew will
extend from the bottom of the spring.
4. Threadthe #10-24 hexnut (Z) on the
slottedheadscrew(V).Threadit halfwayup.
5. Threadscrew (V) into cableadjuster(X).
6. Hook cablespring (W, Fig. 2-6) into "V'-
shapedbend in theforward clutch bail (Y).
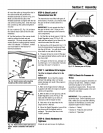
7. Lift and hold the Forward Clutchbail
against the handlebar.SeeFig. 2-7.
8. Measurethe lengthof the cable spring
betweenthe ends of the coils (Fig. 2-7).
The lengthshould be approximately 1-7/8".
If the length is correct, turn the #10-24 hex
nut (Z) down tightly againstthe cable
adjuster (X) while holding theadjuster in
place. See Figure2-7. If the length is
incorrect, you must makeanadjustment to
the cabletension as described in
"Checking andAdjusting ForwardDrive
BeltTension" in Section 5. Whenthe
spring length is correct, tighten the hexnut
(Z)against the cableadjuster (X).
STEP5: Install ReverseClutch
Cable
1. Removethetwo pre-installedself-tapping
screws (AA,Fig. 2-8) from the handlebars.
2. Positionthe reversecablemounting
bracket(BB, Fig.2-8) asshown and
reinstall thetwo self-tapping screws.
8. Unwrapthe reverseclutch cable(the
cablewith a knoband a large hex nut
attachedto it) from around its shipping
position and routethe cable(CC,Fig.2-8
and Fig.2-9) up to thecable bracket(BB,
Fig.2-8). Be surethat the cablegoes
beneaththe Forward ClutchBailas it is
routed upto the cablebracket.
8
R
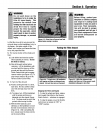
Fig, 2-4: Installing forwardclutchcable bracketand cable.
W-- Fig,2-5:Assemble
springandadjuster,
V-- --Z
X--
Fig,2-6:Installforwardclutchcable,
Fig.2-7:Measurecablespring.