


Section4: Operation
Startingthe Engine
Thefollowing stepsdescribe howto start
and stop the engine. Donotattemptto
engagetines or wheels untilyouhave
read all the operatinginstructionsinthis
Section. Alsoreview thesafetyrules in
Section1: "Safety" andthetiller and
engine controlsinformationin Section
3: "Features andControls."
CAUTION
To help prevent serious
personal injury or damage to
equipment:
• Before starting engine, put
both wheels in the WHEEL
DRIVE position. Never have
the wheels in the
FREEWHEEL position when
the engine is running. When
the wheels are in
FREEWHEEL, they do not
hold back the tiller and the
tines could propel the tiller
rapidly backward.
• Before starting engine, put
Forward Clutch Bail (all
Models) and Reverse Clutch
Control in neutral (disen-
gaged) positionsbyreleasing
levers.
• Never run engine indoors or
in enclosed, poorly venti-
lated areas. Engine exhaust
contains carbon monoxide,
an odorlessand deadly gas.
• Avoid engine muffler and
nearby areas. Temperatures
in these areas may exceed
150OF.
1. Completethe "Pre-Start Checklist" on
the previous page.
2. Putthewheels in theWHEELDRIVE
position (see"Wheel Drive Pins" in
Section 3).
S. Putthe Depth RegulatorLeverinthe
"travel" position (leverall the way down)
so that thetines areclear of the ground.
4. Releaseall controls on the tiller.
5. If engineis equipped with a fuel valve,
1tprn4valveto open position as instructed
in the separateEngineOwner's Manual.
6. Putignition switch and/or throttle
control leveron engine in "ON," "RUN,"
"FAST"or "START" position as instructed
in the separateEngineOwner's Manual.
7. Chokeor prime engineas instructed in
theseparateEngine Owner'sManual.
8. Placeone hand onthe fueltank to
stabilizethe unit whenyou pull the starter
handle. Usethe recoil starter ropeto start
theengine as instructed in the separate
EngineOwner's Manual. When engine
starts,gradually move chokelever(on
enginesso equipped)to "NOCHOKE,"
"CHOKEOFF"or "RUN" position.
WARNING
Hot surfaces can causesevere
burns. Do not touch muffler or
adjacent areas.
9. Usethe "FAST"throttle speedsetting
whentilling.
WARNING
Keep away from rotating
tines. Rotating tines will
cause injury.
Stoppingthe EngineandTiller
1. To stop the wheelsand tines, release
the ForwardClutch Bail or the Reverse
ClutchControl- whichevercontrol is in
use.
2. To stop the engine,put the throttle
control leveron engine in "OFF"or
"STOP"position.
OPERATINGTHETILLER
Thefollowing pagesprovide guidelinesto
using your tiller effectivelyand safelyin
various gardening applications. Besure
to read "Tilling Tips & Techniques" in this
Section beforeyou actually putthe tines
into the soil.
This is a CRT(counter-rotating tine) tiller.
Asthe wheels pull forward, thetines
rotate backward.
This createsan "uppercut" tine action
which digs deeply, uprooting soil and
weeds. Don't overloadthe engine,but dig
asdeeplyas possible on each pass. On
later passes,thewheels maytend to spin
in thesoft dirt. Helpthem along by lifting
up slightly on the handlebar(palm facing
up).
1. Follow the "Pre-Start Checklist" on the
previous page. Besurethat the wheels
are in the WHEELDRIVEposition.
2. Putthe Depth Regulator Leverin the
"travel" position (lever all the way down)
so that the tines are clear ofthe ground.
Usethis positionwhen practicing with
your tiller or when moving to or from the
garden. When you are readyto begin
tilling, you must move the Depth
RegulatorLeverto the desireddepth
setting (see"Tilling Tips & Techniques").
Checkthat the Anti-Reverse Stakeswivels
freely backandforth. Removeanyclogged
material on or around the stake.
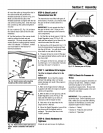
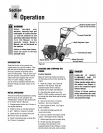
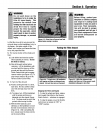
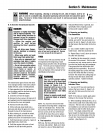
Figure4-2: Useonehandtoguidetiller
whenmovingforward.
3. Start the engineand allow itto warm
up. When warm, put throttle control in
fast speedsetting.
4. Forforward motion of wheelsand
powerto thetines:
(a) Pull the Forward Clutch Bail up and
hold it againstthe handlebar. Release
the bail to stop forward motion of
thewheels and powerto the tines.
(b) Asthe tiller movesforward, relaxand
letthewheelspull theunit alongwhile
the tines dig. Walk behindand a
little to one side ofthe tiller. Usea
light but securegrip with onehand
on the handlebars,keepingyour arm
loose. SeeFigure4-2.