OPERATION
WARNING
To
prevent personal injury
from electrical shocks:
• Do not use
the
120V electric starter
in
the
rain.
• Do not stand in
puddles
or
on
damp
ground
when
using
the
electric starter
or
when
connecting
the
electrical cord.
D.
Gradually move the choke knob
to
its NO
CHOKE position and allow the engine
to
warm
up.
9.
To
start the engine with the (optional)
120V
electric starter:
WARNING
If
the
auger
spins
before
you
squeeze
the
Auger
Drive Lever,
or
if
the
auger
continues
to spin after you
release
the
Auger
Drive Lever,
do
not
use
the
snowthrower.
Shut
the
snow-
thrower's
engine
off,
disconnect
the
spark
plug
wire
and
prevent it from
touching
the
spark
plug. Adjust
or
repair
the
auger
drive
mechanism.
See
"Auger
Drive
Cable
Adjustment'
'.
Failure to follow
this
instruction
could
result in personal injury
or
property
damage.
11.
Check the operation of the Wheel Drive Lever
as
follows:
A. Plug the electrical cord into the switchbox
on
top of the engine.
B.
Plug the other end of the electrical cord into
a properly grounded
120V
wall outlet.
C.
Push the starter button
on
top of the switch-
box.
As
soon
as
the engine starts, release the
button.
D.
Gradually move the choke knob to its
NO
CHOKE position and allow the engine
to
warm
up.
E.
After the engine
is
warmed
up,
unplug the
electrical cord from the
120V
wall outlet. Then
unplug the electrical cord from the switchbox
on
top of the engine.
10.
Check operation of the Auger Drive Lever as
follows:
A. Quickly squeeze and release the Auger Drive
Lever.
B.
The auger should begin spinning when
you
squeeze the
lever.
It should stop spinning when
you release the
lever.
A. Unscrew the gas tank cap from the
engine's gas tank.
B.
Insert a clean funnel into the gas tank (or
use a fuel container that has a flexible pour
spout).
C.
Pour the gas into the tank. Don't fill the
tank all the
way.
Leave approximately
1f4-inch
of air space between the top of the fuel and
the bottom of the gas tank's filler neck.
D.
Wipe
up
any spilled gas. Securely reinstall
the gas tank cap.
2. Move the shift handle (Figure
3-3,
Item
D)
to
its
Neutral position
(N).
3.
Turn
the engine ignition
key
(Figure
3-1,
Item
E)
to
its RUN position.
4.
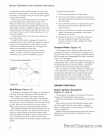
Move the choke knob (Figure
3-4,
Item
G)
to
its
FULL CHOKE position if the engine
is
cold - or
to a partial choke position if the engine
is
warm
from a previous run.
5.
Push the pre-starting primer button (Figure
3-4,
Item
H)
two or three times. Omit this step if
you
are
using the
120V
electric starter. If the engine
is
still warm from a previous run, push the pre-start
primer button one time only. If the temperature
is
below
15°F,
you may have
to
push the pre-
starting primer button more than three times.
6.
Move the engine control lever
to
its
FAST
position.
7.
Make sure that both handlebar levers (Auger
Drive and Wheel Drive) are released.
WARNING
Engine
exhaust contains
carbon
monoxide, an
odorless
and
deadly
poison.
Do
not run
the
engine
indoors
or
in a
poorly
ventilated area.
Failure to follow
this
instruction could
result in personal injury.
8.
To
start the engine with the recoil starter:
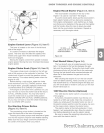
A. Grasp the black plastic handle of the recoil
starter rope (Figure
3-5,
Item
I).
Look behind you
to make sure there are no obstacles
in
the
way.
Place your other hand
on
the right-hand handle-
bar to stabilize the snowthrower when you pull
the recoil starter rope.
B.
Pull the recoil starter rope handle out slowly
until you feel some resistance from engine
compression.
C.
Then pull the handle rapidly. Allow the start-
er rope
to
rewind slowly. Repeat
as
necessary
until the engine starts.
15


