


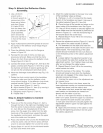

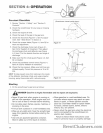

Step
3:
Attach
the
Deflector
Chute
Assembly.
1.
Use a
3/8-inch
wrench and a
5/16-inch
wrench to
remove two of the
three sets of shims
and clips (Figure
2-3, Items D
&
E)
from the lower, rear
part of the deflector
chute assembly.
Don't remove the
shim and clip that is
in front of the chute
opening.
2.
Apply
multipurpose automotive grease all around
the surface of the deflector chute flange (Figure
2-3, Item
F).
3.
Place the deflector chute onto the flange as
shown in Figure 2-3.
4. Reinstall the two sets of shims and clips you
previously removed. Make sure that the shims
(Figure 2-3, Item
D)
are above the deflector chute
flange (Figure 2-3, Item
F).
5. Connect the chute crank (Figure
2-1,
Item G) to the
plastic universal joint (Figure
2-1,
Item
H)
by using
the
hammer
and block of wood to gently tap the
roll pin into the universal joint and chute crank.
6.
Move the discharge chute deflector cap (Fig. 2-3)
upward.
7.
Rotate the chute control crank at the handlebar
console to make sure that the deflector chute
turns without binding. If the deflector chute binds,
readjust bracket (Figure
2-1,
Item J) as follows:
A.
Loosen screw (Figure
2-1,
Item
K).
B. Adjust bracket (Figure
2-1,
Item J) by moving it
inward or outward as necessary.
C.
Retighten screw (Figure
2-1,
Item
K).
D. Repeat Step
7.
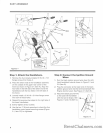
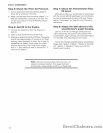
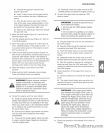
Step
4:
Attach
Cables
to
Control
Levers.
1.
Place one of the hex screws (Figure
2-1,
Item
L)
through the hole in the right-hand handlebar lever.
Hold the screw in place and put a spacer (Figure
2-1,
Item M) over the threaded end of the hex
screw. Run the auger drive cable from the right-
hand side of the snowthrower, upward beneath
the handlebar control panel, and place the upper
end of the cable over the spacer.
2. Place a flat washer and nut onto the threaded end
of the hex screw. Use a 5/16-inch and a
3/8-inch
wrench to securely tighten the nut and hex screw.
3.
Repeat Steps
4-1
and 4-2 for the left-hand handle-
bar lever and wheel drive cable.
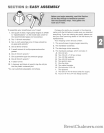
EASY
ASSEMBLY
4. Attach the cable brackets to the lower inner side
of the handlebar tubes as follows:
A.
Remove a
114-20
x
3/
4
screw from the inside
bottom of the handlebar and insert it into one of
the cable brackets (Figure 2-2, Item AA).
B. Place the legs of the bracket and screw on the
lower inside of the handlebar tube. See Figure
2-2. Use a
3/8-inch
wrench to securely tighten the
screw. Make sure that the bracket is positioned as
shown in Figure 2-2 - with the horizontal leg of
the bracket above the screw head.
C.
Repeat Steps 4-A and 4-B for the remaining
bracket and screw.
5. Secure the adjustment section (Figure 2-2, Item
N)
of the cable to the cable bracket as follows:
A. Pull downward on the cable and insert the
adjustment section
of
the cable into the slot in the
cable bracket. The horizontal leg of the cable
bracket should fit between the two nuts that are
on the threaded portion of the cable's adjustment
section.
B. Loosely tighten the adjustment section's two
nuts to prevent the cable from pulling free of the
adjustment section. You'll tighten these nuts later,
after you've checked the cable tension.
C.
Repeat Steps 5-A and 5-B for the remaining
cable bracket and cable.
6. Check the tautness of the cables. The cables
should just barely be taut when the handlebar
levers are not engaged. If the cables have to be
adjusted, proceed as follows.
A.
Unscrew the upper nut on the adjustment sec-
tion several turns.
B. If the cable tension is too loose, screw the
lower adjustment section nut counterclockwise (as
viewed from above) until the cable is taut.
If the cable is too taut, screw the lower adjust-
ment section nut clockwise (as viewed from
above) until the cable is just taut.
C.
Use a
112-inch
open-end wrench to hold the
lower nut in place. Screw the upper nut clockwise
until it touches the cable bracket. Use another
112-inch
open end wrench to securely tighten the
adjustment section's upper nut tight against the
cable bracket.
D.
Again check the tension of the cable to make
sure that the tightening procedure did not upset
the cable's adjustment.
9