


18
Troubleshooting
Troubleshooting, Adjustments, & Service
TROUBLESHOOTING
Troubleshooting procedures are provided in the
following chart. To use these procedures, first locate
the problem description that best describes the
trouble that you have encountered. Check the
possible causes one at a time in the order that they
are listed. Correct any problems that are found and
try to operate the rotary tiller again to see if you have
eliminated the trouble.
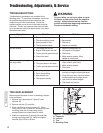
WARNING
For your safety, do not try to adjust or repair
the tractor or rotary tiller while the engine is
running. Always remove the key from the
ignition switch before beginning maintenance
to prevent accidental starting.
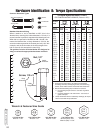
Symptom Problem Solution
Rotary tiller tines do not rotate. 1. Drive belt or pulleys oily.
2. Tiller drive belt too loose.
3. Rock jammed in tiller.
4. Tiller drive belt broken.
1 Clean as required.
2 Replace belt.
3. Remove it.
4. Replace as needed.
Tills too shallow 1. Tiller depth set too low.
2. Engine RPM speed too low.
3. Tractor ground speed too fast.
4. Ground too hard.
1. Adjust the attachment lift.
2. Set engine to full speed.
3. Slow down.
4. Make several passes, tilling
deeper on each pass.
Tiller leaves ground rough
with large clods.
1. Ground too wet.
2. Tilling too deep in one pass.
3. Tractor ground speed too fast.
1. Wait until sod does not ball up
when rolled in your hand.
2. Make several passes.
3. Slow down.
Tractor handles poorly. 1. Tractor ground speed too fast.
2. Front wheels lifting.
3. Rear wheels slip.
4. Tiller propels tractor.
1. Use slower speed, especially when
running on rough or sloping surfaces.
2. Clean dirt from tiller. Use front wheel
counterweights and weight carrier.
3. Use chains or wheel weights.
4. Tiller depth set too low.
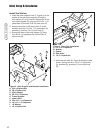
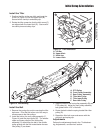
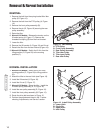
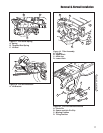
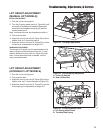
TINE REPLACEMENT
When required because of wear or breakage, replace
a tine as follows.
1. Remove two capscrews (A, Figure 21) and
locknuts (B).
2. Remove old tine (C) from tiller.
3. Place new tine on mounting plate (D). When
facing front of tiller, be sure tine curves away from
mounting plate with its sharp edge facing
rearward when tine nears bottom of travel.
4. Insert two capscrews (A) through tine and then
through mounting plate (D). Install and tighten
locknuts (B) to 30 lb-ft (40 Nm).
D
C
A
B
Figure 21. Tine Replacement
A. Capscrew
B. Locknut
C. Tine
D. Mounting Plate