


13
Setup & Installation
Initial Setup & Installation
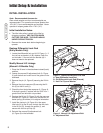
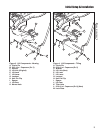
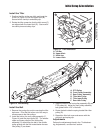
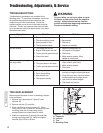
Install the Tiller
1. Position the tiller at the rear hitch and insert the
lift bar (A, Figure 13) into the upper hitch (B).
Secure with a clevis pin and safety clip.
2. Rotate the tiller upward so that the hitch arms (C)
are aligned with the lower hitch (D). Secure with
two clevis pins and safety clips.
C
D
B
A
Figure 13. Tiller Installation
A. Lift Bar
B. Upper Hitch
C. Hitch Arm
D. Lower Hitch
A
B
F
D
E
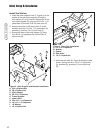
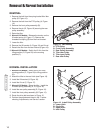
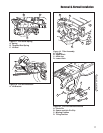
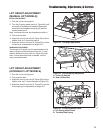
Figure 14. Belt Routing
A. PTO Pulley
B. Front Pulley Assembly
C. Rear Pulley Assembly
D. Tiller Idler Pulley
E. Tiller Input Pulley
F. Rear Idler Pulley
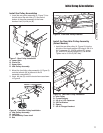
Install the Belt
1. Remove the spring clip and pin securing the tiller
belt cover. Pivot the belt cover out of the way to
allow access to the tiller pulleys.
2. Install the belt on the rear pulley assembly (C,
Figure 14) and tiller input pulley (E). The smaller
upper and lower pulleys of the rear pulley
assembly (C) should trap the belt in the middle
pulley groove with the belt routed below the rear
idler pulley (F) as shown.
3. Install the belt on the front pulley assembly (B) and
PTO pulley (A). Adjust the front pulley assembly
belt guides within 1/16” of the belt.
4. Route the belt inside the spring-loaded tiller idler
pulley (D).
5. Reposition tiller belt cover and secure with the
clevis pin and spring clip.
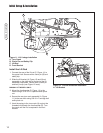
Adjustments
Perform the adjustments found in the “Toubleshoot-
ing, Adjustments, -and Service” section.
F