


12
Setup & Installation
Initial Setup & Installation
D
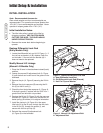
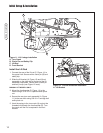
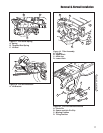
Figure 11. Lift Linkage Installation
A. Turn Crank
B. Clevis Pin and Safety Clip
C. Lift Rod
D. Front Bracket
A
C
B
Install the Lift Rod
1. Connect the rear of the lift rod (C, Figure 11) to
the upper hitch. Secure with a clevis pin (B) and
safety clip.
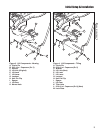
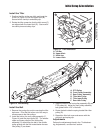
2. Slide the lift bracket (A, Figure 12) and lift rod
assembly on the right stub at the end of the lift
assembly cross-shaft. Secure with a clevis pin
and hair pin clip (see Figure 12 inset).
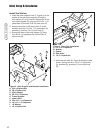
MANUAL LIFT MODELS ONLY:
3. Mount the front bracket (D, Figure 11) to the
frame using a 5/16-18 x 1 capscrew and nylock
nut.
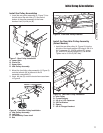
4. Secure the rear turn crank assembly (A, Figure
11) to the rear hitch using 3/8-16 x 1 carriage bolt
and nylock nut.
5. Hook the spring to the turn crank (A) and put the
threaded rod through the front bracket (D). Turn
the crank until the nut is captured in the front
bracket.
Figure 12. Lift Arm Extension Installation
A. Lift Bracket
A