


KR-3
Owner’s Manual
—
Panel descriptions
6
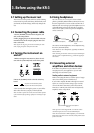
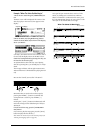
• Floppy disks have a “WRITE PROTECT” tab which can
protect the disk from accidental erasure. It is recom-
mended that the tab be kept in the PROTECT position,
and moved to the WRITE position only when you wish to
write new data onto the disk.
• Disks containing important performance data for this
unit should always be locked (have their write protect tab
slid to the “Protect” position) before you insert them into
the drive of another instrument (except the PR-300, or a
product of the HP-G, MT, KR, or Atelier families), or into
a computer’s drive. Otherwise, when performing any disk
operations (such as checking the contents of the disk, or
loading data), you risk rendering the disk unreadable by
the KR-3’s disk drive.
• The identification label should be firmly affixed to the
disk. If the label comes loose while the disk is in the drive,
it may be difficult to remove the disk.
• Put the disk back into its case for storage.
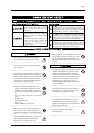
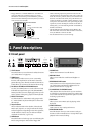
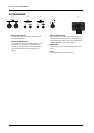
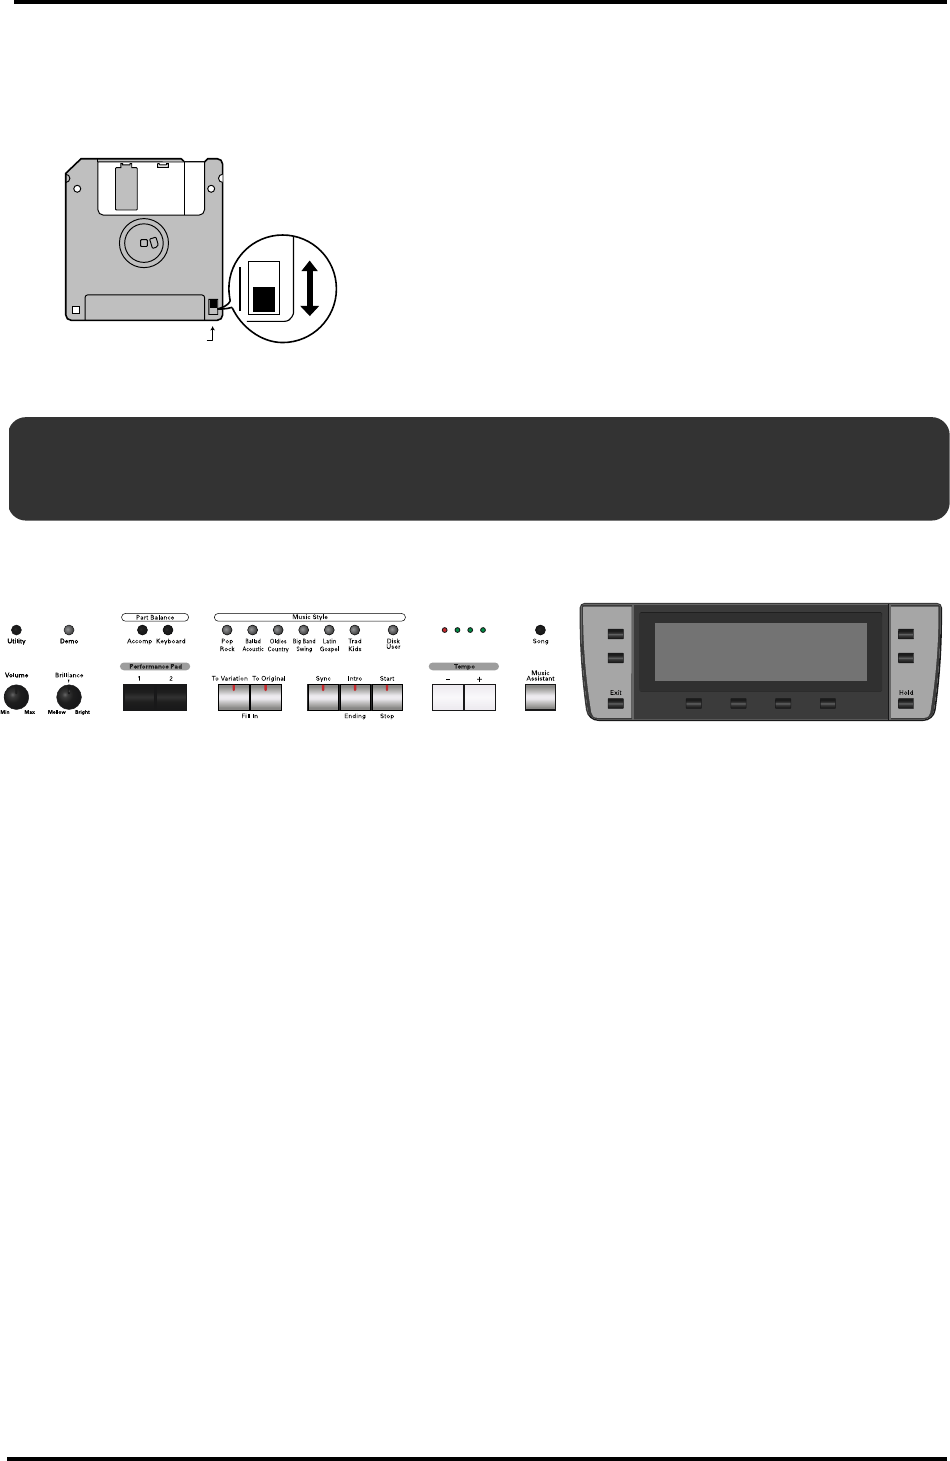
2.1 Front panel
A
UTILITY button
Press this button to access the KR-3’s Utility functions
(see “Utility Menu” on page 46).
B
DEMO button
This button provides access to an on-screen Help
function with explanations of the KR-3’s functions,
games allowing you to identify sounds and chords, etc.
It also allows you to listen to the internal demo songs.
C
Part Balance ACCOMP and KEYBOARD buttons
Use the [ACCOMP] button to set the volume of each
individual accompaniment part. The [KEYBOARD]
button provides access to a display page where you can
set the volume of the part(s) played via the keyboard.
D
MUSIC STYLE buttons
Use these buttons to select Music Style groups. Refer
to “Internal Music Styles & Disk Styles” at the end of
this manual.
E
Tempo indicators
These indicators flash in the rhythm of the selected
Music Style, sequence, or Song to indicate the tempo
and time signature. Depending on the time signature,
not all indicators may be used, or the last indicator
may flash several times (e.g. for 6/8).
F
SONG button
Press this button to load songs you recorded using the
KR-3’s Song Composer and saved to floppy disk.
G
VOLUME knob
Adjusts the instrument’s overall volume.
H
BRILLIANCE knob
Allows you to make the overall sound brighter or
darker.
I
PERFORMANCE PAD buttons
Various functions can be assigned to these buttons
(see “Performance Pad buttons: additional or fre-
quently used functions” on page 44).
J
TO VARIATION & TO ORIGINAL buttons
These buttons have two functions: you can use them
to select the accompaniment pattern for a Music Style
or to switch from the accompaniment pattern to a Fill-
In during a performance.
K
SYNC button
Allows you to start a Music Style by playing on the
keyboard.
L
START/STOP button
Used to start or stop a Style performance.
M
INTRO/ENDING button
Press this button when you want to start a Style per-
formance with an introduction, or to stop Music Style
playback with a musical ending.
Rear side of the disk
PROTECT
(prevents writing to disk)
WRITE
(you can save new data to disk)
Write protect tab
2. Panel descriptions
AB EF
GH I J LMKNOP R
Q
CD