


MAINTENANCE
FN10/FN15 NITRO 01/11 Maintenance Section 5-13
© 2010 Alamo Group Inc.
MAINTENANCE
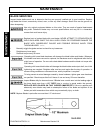
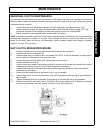
SEASONAL CLUTCH MAINTENANCE
It is important that the clutches slip when an obstacle or load heavier than the clutch setting is encountered.
Before using the cutter each season, use the following procedure to make sure the clutch will slip and give the
overload protection required.
1. Loosen Bolts (#8) until gap between adjusting nut (#7) and guide ring is approximately 1/16".
2. Attach machine to tractor, set engine at approximately half throttle and quickly engage PTO. This
procedure will break clutch facings loose and allow the proper torque to be maintained.
3. Return the bolts to their original position as described in (b) above.
NOTE: If machine sits outside longer than 30 days and is exposed to rain and humid air, the clutches should be
removed from machine and stored in a dry area. Clutch facings will soak up moisture and cause the metal
plates to rust badly. When this occurs, the break-away torque increases greatly and damage to gearbox,
driveline, or tractor PTO can occur.
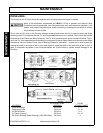
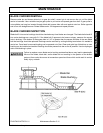
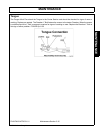
SLIP CLUTCH REPAIR PROCEDURE
1. Remove two bolts from top cover plate which holds shield bracket to gearbox.
2. Remove locknuts #11 from bolts #12.
3. Remove cotter pin #13, castle nut #14, and washer #15. NOTE: It may be necessary to rotate yoke to
remove cotter pin. Remove driveline yoke from shaft.
4. Loosen three bolts #8 until large nut #7 maybe removed from hub #1.
5. Remove all parts from hub #1.
6. Clean or sand outer plates #2 and center plate #4 to remove rust or burned lining material from plates.
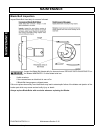
7. Reassemble clutch as shown in Figure 22 replacing parts as necessary.
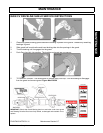
8. Install driveline yoke onto shaft and install four bolts through yoke spacer #10 and center plate #4.
Install locknuts and tighten.
9. Rotate yoke and center plate so that cotter pin #13 can be installed.
10. Tighten large nut #7 as much as possible by hand. NOTE: Make sure both springs #5 are centered on
guide ring #6.
11. Tighten three bolts #8 as far as possible. Clutch setting is automatically set by this procedure.
12. Reinstall washer #15 and castle nut #14. CAUTION: Do not ever tighten nut #14. Tighten only enough
to remove play between the yoke, washer #15 and nut #14. Install cotter pin.