


MAINTENANCE
FN10/FN15 NITRO 01/11 Maintenance Section 5-12
© 2010 Alamo Group Inc.
MAINTENANCE
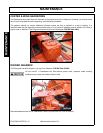
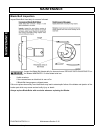
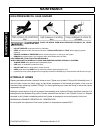
BLADE CARRIER INSTALLATION
Clean the splines on both the blade carrier and output shaft. Position carrier on the gear box output shaft and
install flat washer and 1" hex nut. Tighten nut holding blade carrier to minimum 600 ft. pounds, strike the carrier
on the hub several times with a heavy hammer to seat the hub. Use a suitable spacer over the nut to prevent
damage to the nut and threads. Retighten the nut to 600 ft. pounds. Install and spread cotter pin.
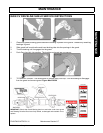
Operating the mower with a loose blade pan or holder can damage the taper connection on
the gearbox output shaft. To ensure proper seating between the blade holder and output
shaft check and tighten the retaining nut after the first day of operation. Recheck the blade
carrier attachment each morning before operating. Grasp the carrier firmly with both hands
and try to push and pull the carrier with one hand while pulling and pushing with the other
hand to try to rock or oscillate the blade carrier. If the carrier is loose retighten the retaining
nut before operating the mower.
Avoid personal injury. Do not work under cutter without support blocks to keep frame from
falling.
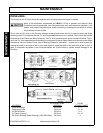
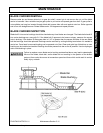
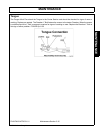
TORQUE LIMITER
A slip clutch in incorporated in the PTO driveline. It is designed to slip, absorb the shock load, and protect the
driveline. Avoid overheating of clutches by too long or too frequent slipping of the clutch since this can damage
the friction plates and clutch parts. When checking slip clutch for overheating, DO NOT touch with hand. Clutch
could be extremely hot and cause severe burn. After the first hour of operation, the slip clutch should be
checked for overheating. After this first check, the slip clutch should be checked weekly or anytime there is
overheating.
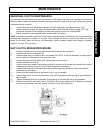
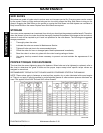
If an adjustment is required, this may be done in the field by following the procedure outlined below. Following
these instructions will give maximum rated torque and long life.
f. With the three Capscrews (#8) backed out until the points are below the surface of the circular
Adjusting Nut (#7), run Adjusting Nut up finger-tight, or slightly less than finger-tight.
g. Alternately tighten the hardened, cup point Capscrews (#8) no more than one-half turn at a time until
the Capscrew heads "Bottom Out". Do not over tighten the Capscrews nor completely flatten the
Spring Washers (#5).
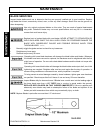
The slip clutch should be checked periodically and adjusted to compensate for wear. The lining plates are 1/8"
thick when new. Replace after 1/32" wear. If the mower has been idle for an extended period of time, or in wet
weather, before operating check to be sure the friction lining plates are not rusted/corroded together. Should
this occur refer to the procedure described in the " Seasonal Clutch Maintenance" Section on the next page.