


P/N 472128 Rev. E 11-5-07
14
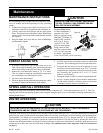
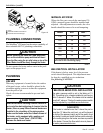
24"
DOOR
18"
6"
6"
VENTILATION
OUTDOOR INSTALLATION ONLY
For outdoor installation with built in vent top, the heater
must be placed in a suitable area on a level,
noncombustible surface. Do not install the heater under
an overhang with clearances less than 3 feet from the top
of the heater. The area under an overhang must be open
on three sides.
IMPORTANT!
In an outdoor installation it is important to protect
your heater from water damage. Ensure water is
diverted from overhanging eves with a proper gutter/
drainage system. The heater must be set on a level
foundation for proper rain drainage.
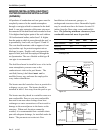
Maintain minimum clearances as indicated below. Install
a minimum of 4 feet below, and 4 feet horizontally from
any opening to a building.
The heater should not be installed closer than 6 inches to
any fences, walls or shrubs at any side or back, or any
combustible material, nor closer than 18 inches at the
plumbing side. A minimum clearance of 24 inches must
be maintained at the front of the heater.
Installation (contd.)
STACK TYPE OUTDOOR VENT KIT
IMPORTANT!
When locating the heater, consider that high
winds can roll over or deflect off adjacent
buildings and walls. Normally, placing the
heater at least three feet from any wall will
minimize downdraft.
Unusually high prevailing wind conditions and
downdrafts may require the use of a stack type
outdoor vent kit (available at additional cost).
NOTE
This unit shall not be operated outdoors at
temperatures below 0
o
F. for propane and -20
o
F. for
natural gas.
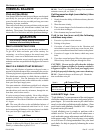
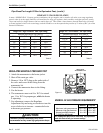
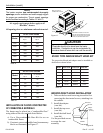
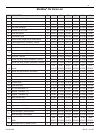
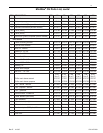
Figure 14.Figure 13.
ledoMpaCtneV.oNtcudorP.aiDtneV
05151VO732064.ni6
00202VO222064.ni7
05252VO322064.ni7
00303VO422064.ni8
05353VO522064.ni9
00404VO622064.ni01
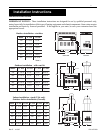
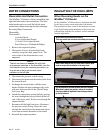
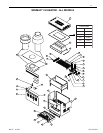
OUTDOOR VENT CAP INSTALLATION
The MiniMax
®
CH heater is shipped standard as an
outdoor stackless unit. To install the outdoor vent kit:
1. Take out the louvered outer top after first
removing all 1/4 in. sheet metal screws attaching
it along its perimeter to the cabinet. Set it aside.
2. Place the flue adaptor over the flue collector
opening. Temporarily, put the top cover, from the
kit, on with the label to the front of the heater.
Center the flue adaptor evenly inside the top cover
flue stack opening. Remove the top cover and
secure the centered flue adaptor to the inner panel
with the provided #8 x 1/2 in. drill qwik screws.
3. Place the top cover, with the hole for the stack, on
the heater cabinet.
4. Install the vent stack through the hole in the top
cover, over the flue adaptor top ring.
5. Using a 3/32 in. drill bit, position the “L” bracket
to hold the top cover and outdoor stack. Drill the
pilot holes through the “L” bracket holes to accept
the screws.
6. Secure the vent stack and the inner top with the
#8 x 1/4 in. sheet metal screws through the “L”
brackets.
Outdoor Stack
Top Cover
Flue Adaptor
Inner Panel
Flue Collector
Figure 12.
Table 11.