


4
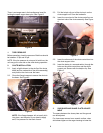
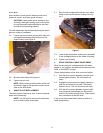
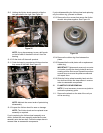
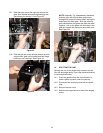
5.4. Loosen the hex jam nut on the auger control
cable "Z" fitting and rotate the coupling end of
the cable downward to provide more slack or
upward to take up slack. See Figure 8.
5.5. Retighten the hex jam nut and repeat all three
tests to verify proper adjustment has been
achieved.
6. AUGER CONTROL TESTING AND ADJUST-
MENT
6.1. Start the engine and run it at full throttle.
6.2. While standing in the operator position, engage
the auger. Do this several times.
6.3. Release the auger control and walk to the front
of the unit. Confirm that the auger has com-
pletely stopped rotating and shows NO signs of
motion.
IMPORTANT: If the auger shows ANY signs of
rotating, immediately return to the operator's
position and shut off the engine. Wait for ALL
moving parts to stop before re-adjusting the
auger control.
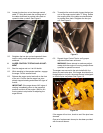
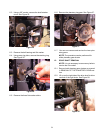
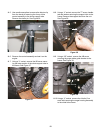
6.4. To readjust the control cable, loosen the hex jam
nut on the auger control cable "Z" fitting. Rotate
the coupling end of the cable counterclockwise
to provide more slack. Retighten the hex jam
nut. See Figure 9.
6.5. Repeat Auger Control Test to verify proper
adjustment has been achieved.
WARNING: Never attempt to make any adjust-
ments while the engine is running, except where
specified in operator's manual.
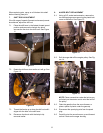
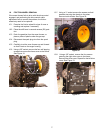
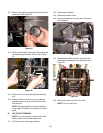
The augers are secured to the spiral shaft with four
shear pins and cotter pins. If the auger should strike a
foreign object or ice jam, the snow thrower is designed
so that the pins may shear. See Figure 10.
If the augers will not turn, check to see if the pins have
sheared.
One set of replacement shear pins has been provided
with the snow thrower.
Figure 8
Hex Jam Nut
Figure 9
Hex Jam Nut
Figure 10
Shear Pins