


3
shave plate.
Use a middle or lower position when the area to be
cleared is uneven, such as a gravel driveway.
CAUTION: Loose gravel can be picked up and
thrown by the auger, causing injury to the opera-
tor and bystanders and/or damage to the snow
thrower and surrounding property.
For initial adjustment we recommend placing the shave
plate on a piece of cardboard.
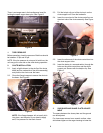
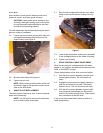
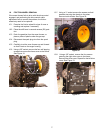
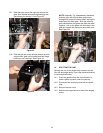
3.1. Loosen the four hex nuts (two on each side) and
carriage bolts attaching the skid shoes to the
auger housing. See Figure 6.
3.2. Move the skid shoes to the ground.
3.3. Tighten the hex nuts.
NOTE: Make certain the entire bottom surface of
skid shoe is against the ground to avoid uneven
wear on the skid shoes.
4. SHAVE PLATE REPLACEMENT
The shave plate will wear over time. It can be replaced
when worn excessively.
NOTE: You willl need to remove the skid shoes
prior to removing the shave plate.
Figure 6
Hex Nuts
Skid Shoe
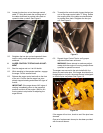
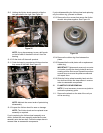
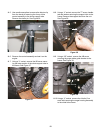
4.1. Remove the carriage bolts and hex nuts, which
attach it to the snow thrower housing. See Fig-
ure 7.
4.2. Install a new shave plate, making sure the heads
of the carriage bolts are to the inside of housing.
4.3. Tighten nuts securely.
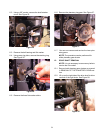
5. DRIVE CONTROL CABLE ADJUSTMENT
When the drive control is released and in the disen-
gaged, or "up" position, the cable should have very little
slack. It should NOT be tight.
Check the adjustment of the drive control as follows:
5.1. With the drive control released, push the snow
thrower gently forward. The unit should roll
freely.
5.2. Engage the drive control and gently attempt to
push the snow thrower forward. The wheels
should not turn. The unit should not roll freely.
5.3. With the drive control released, move the shift
lever back and forth between the R2 position
and the F6 position several times. There should
be no resistance in the shift lever.
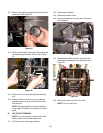
If any of the above tests failed, the drive cable is in
need of adjustment.
Figure 7
Carriage Bolts