19
5.
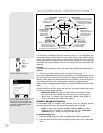
Use the Arrow keys (
5,
Fig. 2
) to locate a br
ight star in the night sky. Use the
smartfinder (
2, Fig. 1a) to help line up on the star. You may choose any unob-
structed, bright star for the purposes of this example. Use AutoStar's Arrow keys
to center the star in the e
yepiece. Once the star is centered, press ENTER to
select "Astronomical." The telescope's tracking motors then engage. It may take
the tracking motors several seconds to begin tracking. When they do, it may be
necessar
y to once again center the star in the eyepiece. The tracking motors will
then keep the star you have chosen in the center of the eyepiece.
6. Press and hold the ENTER key for a few seconds and then release to stop track-
ing.You may repeat the procedure to locate another star or object using the Arrow
keys. Then press ENTER to re-engage the tracking motors.
Go To Saturn
After performing the Automatic Alignment procedure, the motor drive begins
operating and the telescope is aligned for a night of viewing. Objects in the eyepiece
will maintain their position even though the Earth is rotating beneath the stars.
This exercise demonstrates how to select a celestial object, the planet Saturn, for
viewing from AutoStar’s database.
NOTE: Saturn is not visible the entire year and you may need to choose
another object from AutoStar's database; however, the procedure, as
described below, remains the same. If Saturn (or any other object) is not
currently visible in the sky, AutoStar displays “Below Horizon.”
1. After the telescope is aligned, “Select Item: Object” displays. If “Select Item:
Object” is not displayed on your handbox, keep pressing MODE until it does
display. Press ENTER.
2. “Object: Solar System” displays. Press ENTER.
3. “Solar System: Mercury” displays. Keep pressing the Scroll Down key until “Solar
System: Saturn” displays (or you may choose another object from the Solar
System list if Saturn is not visible).
4. Press ENTER. “Calculating” displays. Then “Saturn” and a set of coordinates
displays. Note that Saturn’s (and other planets’) coordinates change throughout
the year.
5. Press GO TO. “Saturn: Slewing...” displays and the telescope slews until it finds
Saturn. You may need to use the Arrow keys to center Saturn precisely in the
eyepiece. AutoStar then automatically moves the telescope so that it "tracks"
Saturn (or whatever other object you may have chosen); i.e., Saturn remains
centered in the eyepiece.
Using the Guided Tour
This example demonstrates using “Tonight’s Best” Guided Tour.
1.
After obser
ving Satur
n, press
MODE twice so that “Select Item: Object” displays
again.
2.
Press the Scroll Do
wn k
e
y twice
.
“Select Item: Guided Tour” displays.
3. Press ENTER. “Guided Tour: Tonight’s Best” displays. Press ENTER.
NOTE: If you wish to try out other Guided Tours, press the Scroll Down
key to scroll through other tour choices. When the tour you wish to select
displays, press ENTER.
4.
“T
onight’
s Best: Searching...” displays. After calculating, “Tonight’s Best: Jupiter”
displa
ys.
NO
TE
:
Diff
erent objects ma
y be displa
y
ed on a tour list on any given night.
T
our objects are selected based on location’
s time and date.
Press ENTER to display information about the object. Press GO TO to move the
telescope to the object.
5. Press MODE to return to the Tour list. Press the Scroll keys to scroll through the
list. Press ENTER when you find the next object you wish to observe.
6. Press and hold down MODE for two seconds to leave the Guided Tour menu.
Tip: Try out the Guided
Tour feature; the “Tonight’s
Best” Guided Tour will
point y
our telescope at the
best objects visible in the
sky f
or every given night of
the y
ear
.
The objects in this
tour may change from
night to night.
Y
ou can easily create y
our
own Guided Tour using the
optional Meade’s AutoStar
Suite softw
are. See
PHO
TOGRAPHY WITH
MEADE’S A
UTOSTAR
SUITE
, page 41 for more
inf
or
mation.
Tip:
The GO TO key also allows
you to perform a "
spiral
search
." A spiral search is
useful when the telescope
slews to an object, but that
object is not visible in the
eyepiece after the
telescope finishes its
search. (This sometimes
occurs during an alignment
procedure.)
Press GO TO when the
telescope stops slewing.
The telescope begins to
move in a spiral pattern at
a very slow speed around
the search area.When the
object does become visi-
ble, press MODE to stop
the spir
al search. Then use
the Arrow keys to center
Important Note:
The first time you use your
telescope or if you are
experiencing any problems
with pointing accuracy,
follow the procedure
described in
APPENDIX
C:TRAINING THE DRIVE,
page 55, to insure accu-
rate pointing and tracking.


