


26
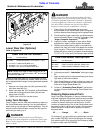
Section 5: Operating Instructions
SB1051, SB1064, SB1574, & SB2584 with S/N 881640- Snow Blowers 370-027M
10/08/14
Table of Contents
General Operator Instructions
It is important that you familiarize yourself with the
Operator’s Manual, complete Operators Checklist,
properly attach the Snow Blower to your tractor, and
make leveling adjustments before running an operational
safety check. If you detect a malfunction in either the
Snow Blower or tractor during the operational safety
check, immediately shut tractor off, remove switch key,
and make all necessary repairs/adjustments before
continuing.
Make sure the tractor park brake is engaged, PTO is
disengaged, and Snow Blower is resting on the ground
before starting tractor for the operational safety check.
Start tractor and set engine throttle speed at a low idle.
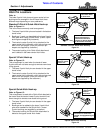
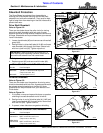
Raise Snow Blower with tractor’s rear hydraulic lift
control lever to transport position making sure that the
driveline does not bind and does not contact the Snow
Blower frame. Lower Snow Blower to the ground and at a
low engine speed engage PTO. If everything is running
smoothly at a low idle, slowly increase tractor engine
RPM until it reaches the Snow Blower’s full PTO
operating speed of 540 RPM. If everything is still running
smoothly, return engine to low idle, and disengage PTO.
You should now be ready to transport to your snow
blowing site at a safe ground speed. On roadways
transport in such a manner that faster moving vehicles
can easily see you and pass you safely. Reduce your
speed when travelling over rough and hilly terrain. Avoid
quick or sharp steering corrections. Take extra care to
ensure that the Snow Blower doesn’t come into contact
with obstacles such as trees, buildings, or fences. Use
accessory lights and appropriate reflective devices to
provide adequate warning to pedestrians and other
vehicle operators when traveling on public roads and in
the dark of night. Comply with all local, state, and federal
laws.
It is important that you know the area where snow is to be
removed and what lies beneath the snow. If possible,
survey the area ahead of the snow. Remove all possible
obstructions and mark any obstructions that cannot be
removed with flags that projectabove thesnow. Ifyou are
unfamiliar with the area, ask someone who can identify
hidden obstructions so that you can mark them with a
flag. Flag manholes, water meters, gas meters, culvert
IMPORTANT: Never operate Snow Blower with
chute throwing snow towards property such as
vehicles and buildings that can be scratched,
dented, or broken by solid objects hitting them.
IMPORTANT: Do not use Snow Blower as a Box
Scraper or to blow other materials. Doing so can
break the auger, impeller, gearbox, driveline, and
cause structural damage to the unit.
NOTE: Always check with local regulations to know
where snow can be legally piled. Never pile snow on
someone else’s property, streets, or sidewalks.
edges, fire hydrants, stumps, and other obstructions that
are not easily seen. It really pays to inspect a new area
and to develop a safe plan before moving snow.
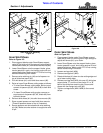
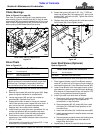
Determine how close to the ground the Snow Blower can
be operated. Set skid shoes or outer wear bars to hold
the Snow Blower off the ground at a predetermined
height. Surfaces with gravel or crushed rock will require a
higher setting than hardflat surfaces such asasphalt and
concrete. Never set Snow Blower so low as to pick-up
grave and rock.
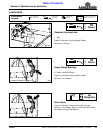
Determine wind direction and devise a removal plan that
will allow wind to carry blown snow away from the
operator and not towards the operator. Snow discharged
out the Snow Blower and blown back at you will obstruct
your view and can totally block your vision of work.
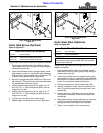
Determine direction to blow snow and rotate chute to
blow snow in that direction. To minimize work, do not
blow snow over an area that has already been cleared of
snow and never rotate chute to blow snow towards the
tractor. Hard objects can be thrown at the tractor and
operator.
Determine chute tilt angle and set chute to this angle.
This angle will vary depending on how far snow is to be
blown, how light and fluffy the snow is, and how wet and
heavy it is.
Some adjustments to the chute rotation and chute tilt
angle may be necessary after traveling a few feet. If
operator needs to get off the tractor to make
adjustments, he must stop the tractor, disengage PTO,
place gear selector in park or in neutral with park brake
set, shut engine off, remove switch key, and wait for PTO
to stop running before dismounting tractor.
It is now time to back the Snow Blower up to your starting
point. Once at your starting point, stop backing up and
lower Snow Blower down onto its skid shoes or wear
bars. Make sure all pressure is off the 3-point lift arms.
The heavier and deeper the snow, the slower your will
need to travel. Make certain you maintain 540 RPM PTO
speed and a travel speed between 1 and 5 MPH that will
allow you to be in control at all times. Make a tractor gear
and rangeselection that will enable you to maintainthese
speed combinations.
Set throttle at an idle speed, and engage PTO. Listen for
unusual clicking or knocking sounds as the auger and
impeller start rotating. If everything sounds fine increase
throttle to 540 RPM PTO speed. If an unusual sound is
heard, shut tractor down immediately, investigate cause,
and make necessary repairs before continuing.
Start backing up slowly with engine running at 540 RPM
PTO speed. If travel speed is too fast, shift gears to a
slower speed. Only shift to a higher speed if you are
certain it will be a safe traveling speed. The heavier and
deeper the snow the slower you will need to travel. Make
certain you maintain 540 RPM PTO speed and a travel
speed that allows you to be in control at all times. Make a
tractor gear and range selection that will enable you to
maintain these speed combinations.