


17
Section 3: Tractor Hook-up & Unhook
10/08/14
SB1051, SB1064, SB1574, & SB2584 with S/N 881640- Snow Blowers 370-027M
Table of Contents
Hydraulic Hook-up
!
DANGER
Hydraulic fluid under high pressure can penetrate skin. Wear
protective gloves and safety glasses or goggles when working
with hydraulic systems. Use a piece of cardboard or wood
rather than hands when searching for hydraulic leaks. If
hydraulic fluid is injected into the skin or eyes, it must be
treated by a doctor familiar with this type of injury within a
few hours or gangrene may result. DO NOT DELAY.
There are two optionsrequiring hydraulic hose hook-ups.
They are hydraulic motor for chute rotation and hydraulic
cylinder for chute tilting. Be sure tractor reservoir is filled
properly before operating hydraulic motor and/or
hydraulic cylinder. If tractor reservoir is low on hydraulic
fluid, there is a chance of drawing air into the system
causing jerky or uneven movements.
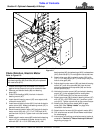
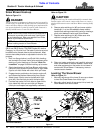
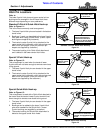
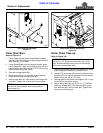
Hydraulic Motor
1. Locate hydraulic motor hoses and connect quick
disconnect couplings to a single duplex outlet on the
tractor. This is best if connected to the control lever
closest to the operator.
2. Set tractor control lever in the non-float position.
3. Cycle hydraulic system by rotating chute until it
points to the left at 90
o
to the direction of travel and
then rotating chute a 180
o
in the opposite direction
Do this several times to purge hydraulic motor of air.
4. Switch quick disconnect couplings at the duplex
outlet if chute does notrotate in the direction desired.
It is best if chute rotates to discharge to the right
when pushing control lever on the tractor forward.
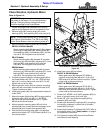
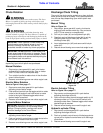
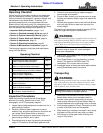
Hydraulic Cylinder
1. Locate hydraulic cylinder hoses and connect quick
disconnect couplings to a single duplex outlet on the
tractor. This is best if connected to the control lever
next to the hydraulic motor control lever.
2. Set tractor control lever in the non-float position.
3. Cycle hydraulic system by extending and retracting
the cylinder several times to purge hydraulic cylinder
of air.
4. Switch quick disconnect couplings at the duplex
outlet if chute does not tilt in the direction desired. It
is best if discharge chute raises when pushing
control lever on the tractor forward.
Electrical Hook-up
There are two options requiring electrical hook-up. They
are electric motor for chute rotation and electric actuator
for chute tilt.
NOTE: It is not necessary to purge the hydraulic
system of trapped air if operation is sluggish. The
cylinder is double acting and will self purge itself of
air as hydraulic oil cycles back and forth through the
cylinder several times.
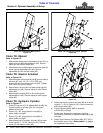
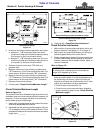
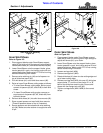
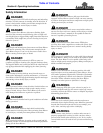
Refer to Figure 3-6:
1. Find a suitable location to mount control box (#1) on
the tractor. Usually this would be close to the
operator’s right-hand side on the tractor fender or
fender console. Exact location should be convenient
for operating toggle switches (#2 & #3).
2. Route power cable eyelets (#10 & #11) to tractor
power source or circuit breaker panel. A 10 Amp or
larger fuse/circuit breaker source should be used.
a. Connect red lead (#10) to a 12 VDC positive (+)
power source.
b. Connect black lead (#11) to a negative (-) 12 VDC
power source.
3. Connect power cable terminal (#13) to control box
terminal (#4).
4. Connect electric motor (chute rotation) and electric
actuator (chute tilt) to the control box as follows:
Electric Motor
Plug chute rotation wire harness (#7) to the red &
black terminal (#5). Verify opposite end of wiring
harness is plugged to the electric motor.
Electric Actuator
Plug chute tilt wire harness (#8) to the white & black
terminal (#6). Verify opposite end of wiring harness
is plugged to the electric actuator.
5. Check routing of wire harness (#7 & #8) to make
certain they will not become pinched or pulled apart.
Tie harness to Snow Blower and tractor as needed
with cable ties. Cable ties are supplied by customer.
Electrical Hook-up
Figure 3-6
33291
Chute Rotate
Wire Harness
Chute Tilt
White Toggle
Chute Rotate
Red Toggle
Chute Tilt
Wire Harness
Power
Terminal
10 Amp fuse
Red Wire
Positive (+)
Black Wire
Negative (-)
White/Black
Rotate Terminal
Red/Black
Tilt Terminal
Control
Box Mount