


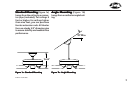


9
41462-01 10/14/2005
®
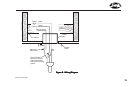
FigurFigur
FigurFigur
Figur
e 2b - Corre 2b - Corr
e 2b - Corre 2b - Corr
e 2b - Corr
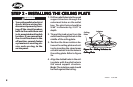
ect Position of Ceilingect Position of Ceiling
ect Position of Ceilingect Position of Ceiling
ect Position of Ceiling
Plate for Angle MountingPlate for Angle Mounting
Plate for Angle MountingPlate for Angle Mounting
Plate for Angle Mounting
FigurFigur
FigurFigur
Figur
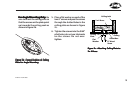
e 2c - Attaching Ceiling Plate toe 2c - Attaching Ceiling Plate to
e 2c - Attaching Ceiling Plate toe 2c - Attaching Ceiling Plate to
e 2c - Attaching Ceiling Plate to
2 x 4 Brace2 x 4 Brace
2 x 4 Brace2 x 4 Brace
2 x 4 Brace
2 x 4 Brace
Ceiling Joist
Ceiling
Outlet Box
Ceiling
Plate
Flat
Washer
3" Wood
Screw
For Angle Mounting OnlyFor Angle Mounting Only
For Angle Mounting OnlyFor Angle Mounting Only
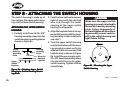
For Angle Mounting Only: Be
sure to orient the ceiling plate so
that the arrows on the plate point
up towards the ceiling peak as
shown in Figure 2b.
5. Place a flat washer on each of the
two 3" screws and pass the screws
through the slotted holes in the
ceiling plate as shown in Figure
2c.
6. Tighten the screws into the 9/64"
pilot holes; do not use lubricants
on the screws. Do not over-
tighten.