


6
41462-01 10/14/2005
®
GAGA
GAGA
GA
THERING THE TOOLSTHERING THE TOOLS
THERING THE TOOLSTHERING THE TOOLS
THERING THE TOOLS
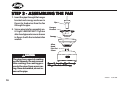
You will need the following tools for
installing the fan:
• Electric drill with 9/64" bit
• Standard screwdriver
• Phillips-head screwdriver
• Wrench or pliers
PREPPREP
PREPPREP
PREP
ARING THE FAN SITEARING THE FAN SITE
ARING THE FAN SITEARING THE FAN SITE
ARING THE FAN SITE
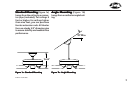
Ceiling height must be a minimum
of 9 feet.
The location of a ceiling fan and
how the fan is attached to the build-
ing structure are essential for reli-
able operation, maximum effi-
ciency, and energy savings. For this
reason, we have included a sepa-
rate booklet — “Guide to Choos-
ing and Preparing a Ceiling Fan
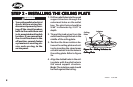
STEP 1 - GETTING READYSTEP 1 - GETTING READY
STEP 1 - GETTING READYSTEP 1 - GETTING READY
STEP 1 - GETTING READY
Site” — to help you select the best
location for your fan. The booklet
also provides information to ensure
your fan support and electric out-
let box meet UL-approved safety
codes for ceiling fans.
The instructions in this installation
manual assume that you have used
“Guide to Choosing and Preparing
a Ceiling Fan Site” to pick the fan
location and make certain the proper
fan support and outlet box are in-
stalled.
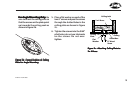
CHECKING YOUR FAN PARCHECKING YOUR FAN PAR
CHECKING YOUR FAN PARCHECKING YOUR FAN PAR
CHECKING YOUR FAN PAR
TSTS
TSTS
TS
Carefully unpack your fan to avoid
damage to the fan parts. Check for
any shipping damage to the motor
or fan blades. If one of the fan blades
was damaged in shipment, return all
the blades for replacement.
Hint: If you are installing more than
one fan, keep the fan blades
in sets, as they were shipped.
If any parts are missing or damaged,
contact your Hunter dealer or call
Hunter Parts Department at
901-248-2222.