


11
41457-01 7/2000
®
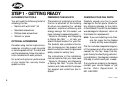
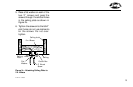
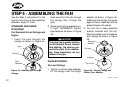
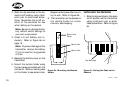
8. Insert the pin into the two holes
in the 12" pipe so that the pin is
placed evenly in the hole.
9. Insert the threaded end of the
pipe into the flat side of the ball.
10.Align the cutouts in the ball with
the pin and the ground screw as-
sembly.
11.Slide the ball up the pipe until it
hits the pin.
12.Insert and tighten the positioning
screw into the ball so that the
head of the screw is tight on the
end of the pipe.
NOTE: Make sure that the ball
is positioned so that it is level or
straight.
CAUTION
Do not overtighten the posi-
tioning screw as it may cause
the ball to seat improperly, re-
sulting in fan wobble and the
fan hanging crookedly.
WARNING
• Failure to complete the
steps above properly could
result in the fan falling.
Figure 3c - 12" pipe assembly
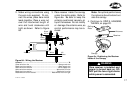
CAUTION
Make sure that the leadwire
assembly is pointing straight
up and away from the pipe.
WARNING
• To avoid possible electrical
shock, the ground screw
must be tightened securely.
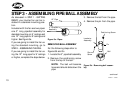
5. Carefully loosen and remove the
ground screw/leadwire assembly
from the pipe.
6. Locate the 12" pipe.
7. Insert and tighten the ground
screw/leadwire assembly into the
small screw hole on one end of
the 12" pipe.