


16
Fi
g
ure 25
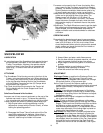
OPERATING INSTRUCTIONS
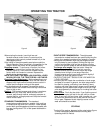
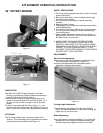
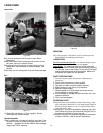
To plow, first run a furrow down the center of the land to
be plowed. Then pivot the Tractor at the end of the
furrow so the Right Depth Wheel is in the furrow just
made. Continue this way so the dirt is always thrown
toward the center (see Figure 25).
If you are plowing a large area, you will be able to "pull"
the Tractor around corners without pivoting. However,
in small areas it is necessary to pivot the Tractor each
time.
When you are ready to pivot, bear down on the Handles
until the Tractor is balanced. "Slip" the Clutch gently,
holding back on the Right Handle, allowing the Engine
to pivot the Tractor with little effort on your part.
Plowing is much easier if the Gear Housing is kept level
with the ground when the Plow is in the furrow and
plowing. To do this, try to obtain all depth adjustment
by the holes in the Hex Shaft, and the horizontal
adjustment by moving the Wheel Bracket laterally.
If you have the eight-speed Transmission, we recommend
plowing with the Tractor in low range, which slows
ground speed to a virtual crawl without affecting
attachment RPM.
ROTARY CULTIVATOR
The Rotary Cultivator is attached to the Rotary Plow
Drive Assembly as follows:
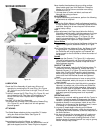
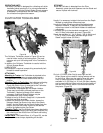
1. Leave the Plow Angle Adjusting Assembly (upper
left in Figure 23) attached.
2. Remove the Hex Shaft (and Plow Blades) from the
Gear Housing.
The Depth Wheels, Wheel Bracket and Column
Assembly (which connects the Wheel Bracket to the
Gear Housing) may be removed.
NOTE
: After the Column Assembly has been removed,
Bolts must be inserted into the Gear Housing to prevent
oil leakage. We recommend short Bolts for this purpose; if
the original Bolts are tightened, the Gears inside the Gear
Housing will be fouled. If, however, you use the original
Bolts, place sufficient Washers on them to prevent Gear
fouling.
3. Remove the four Bolts from the bottom of the Gear
Housing and insert the studs furnished.
NOTE
: When assembling the rotary cultivator to the
plow drive; be sure the oil plug on the drive housing is up
when the cultivator is in the operating position.
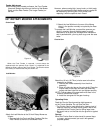
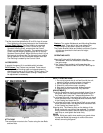
Figure 26
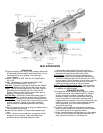
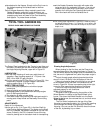
4. Fit the Hood as shown in Figure 26. Insert the
Cultivator Drive Shaft into the Gear Housing.
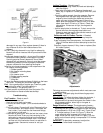
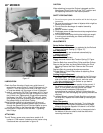
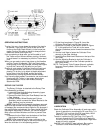
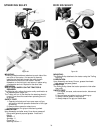
5. Rotate the Cultivator to the position shown in Figure
27. In this position the Tines will cut the same
direction (clockwise) as the forward movement of the
tractor.
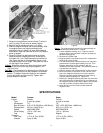
6. Use the Lock Nuts to fasten the Cultivator Drive
securely to the Gear Housing.
7. Install the Dust Shield and Fastener on the top of the
Hex Shaft.
8. Use the Adjusting Bracket to lock the Cultivator in
place with the long axis of the Cultivator parallel to
the Tractor Axles.
NOTE: The Gravely Triple-Purpose Wrench, available
from your Gravely dealer, fits the Cultivator Tine
Shaft Nut.
Figure 27
LUBRICATION
Check the Cultivator Drive Assembly oil level every eight
hours of operation by removing the Oil Level Plug, (1 in
Figure 27). If oil runs out of the Oil Level Hole, the oil
level is all right; if not, oil must be added.
To add oil, remove the Oil Filler Plug, (2 in Figure 27),
and pour through the Oil Filler Hole until oil begins to
run out of the Oil Level Hole. Replace both Plugs when
proper oil level is reached.
Use SAE 140 or 90W EP gear lubricant. Be sure the
Cultivator is level when checking or adding oil.