


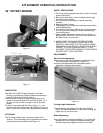
15
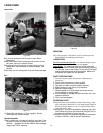
plate attached to the Hopper. Simply set the Port Lever to
the indicate opening to distribute seed or fertilizer
properly.
Care of Hopper Assembly: Many materials used in the
Seeder-Spreader, especially certain fertilizers, are
corrosive. Abrasives also are present. This means the
protective paint soon will wear off the Port Assembly
and Agitator. To protect these surfaces,
wash the Seeder-Spreader thoroughly with water after
using and let it dry, preferably in the sun. If you do not
intend to use it again within a few days, pour a small
quantity of oil along the Port Openings and work the
Port Lever back and forth to distribute the oil.
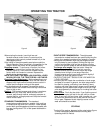
TWIN-TOOL GARDENING
ROTARY PLOW AND ROTARY CULTIVATOR
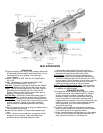
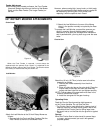
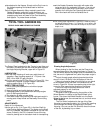
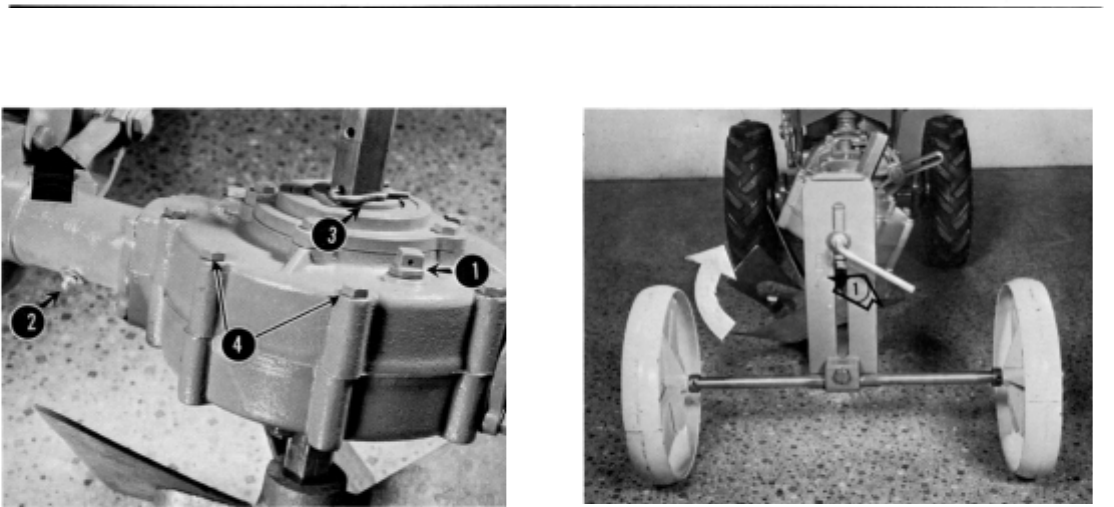
A
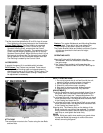
final cutting depth adjustment, is required, is made by sliding
the Wheel Bracket Clamp, (1 in Figure 24), up or down in the
slitted Wheel Bracket. The lower the Clamp is set, the lower
de
p
th of cut.
Figure 23 Figure 24
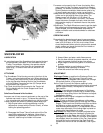
The Rotary Plow is attached to the Tractor by two Nuts and
two Bolts. One Bolt and one Nut must be used to attach
the Angle Adjusting Bracket, upper left in Figure 23.
LUBRICATION
Check the Gear Housing oil level every eight hours of
operation. Gear Housing capacity is 1 1/2 pints. Use
SAE 140 or 90W EP gear lubricant.
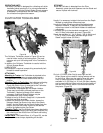
Add oil by removing the Oil Filter Plug (I in Figure 20). Use
occasionally General Purpose Grease in the swivel
casting grease fitting, (2 in Figure 23).
SAFETY PRECAUTIONS
1. Do not let anyone operate the unit without proper
instructions.
2. Keep all shields and safety devices in place.
3. Disengage power to any attachment and stop engine
prior to making adjustments.
4. Pay attention to what you are doing.
5. Don't wear loose fitting clothing that might get caught in
moving parts. Keep hands and feet away from moving
parts.
ADJUSTMENTS
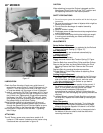
Depth of Cut Adjustment
Use the pin or clip, (3 in Figure 23), in the Hex Shaft for
initial Cutting depth adjustment. The higher on the Shaft
the Pin is inserted, the greater the depth of cut and vice
versa. Ordinarily, the Pin is inserted in one of the top
holes for plowing and in the bottom hole for transporting.
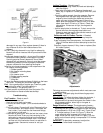
Plowing Angle Adjustment
When plowing for the first time, set the Plow at the
approximate angle to the ground as shown in Figure 24.
The Nut which secures the Angle must be loosened to do
this; be sure it is tightened firmly after the proper angle is
set.
The bolt through angle adjusting bracket should be
about 3/4 inch (19.05cm) from the bottom of the slot.
If there is excessive drag to the left (left, as you stand
at the handles) move the Plow in the direction of the
arrow in Figure 24. If there is excessive drag to the right,
move the Plow opposite the direction of the arrow.
A few trials may be required before the Plow is
adjusted properly to soil conditions.
Width of Cut Adjustment
The width of cut is governed by the position of the
Wheel Bracket in relation to the Depth Wheel in the
furrow. The closer the Wheel Bracket is to the Depth
Wheel in the furrow, the narrower the cut, and vice versa.
DIRT SHIELD
The Dirt Shield is attached to the top of the Gear
Housing by removing the bolts, (4 in Figure 23). inserting
them through the Shield, and replacing in the Gear
Housing. You can use the Dirt Shield to direct the throw
of the dirt, by bending it up or down.