


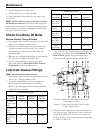
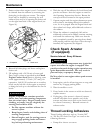

Maintenance
the Engine Owner’s
Manual for additional
information.)
Every 600 hours— Replace
the air cleaner elements.
(May need more often
under severe conditions.
See the Engine Owner’s
Manual for additional
information.)
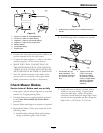
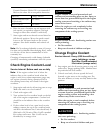
1. Stop engine, wait for all moving parts to stop, and
remove key. Engage parking brake.
2. Unhook two air lter canister latches to gain
access to the air cleaner element.
3. Remove air cleaner canister cover and remove
outer element.
4. Check the condition of the paper element.
Replace if dirty, bent or damaged.
5. Check the condition of the inner element. Replace
whenever it appears dirty, typically every other
time the paper element is replaced. Clean the base
around the inner element before removing, so
dirt does not get into the engine.
6. Do Not wash or use pressurized air to clean
paper element or inner element.
7. Reinstall elements. Position the cover so that the
rubber dust ejector is pointing downward and
secure with retaining clips.
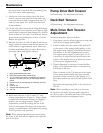
Change Engine Oil
Service Interval: After the rst 5 hours
Every 100 hours/Yearly
(whichever comes rst)
(May need more often
under severe conditions.)
Yearly if operated less
than 100 hours.
1. Stop engine, wait for all moving parts to stop, and
remove key. Engage parking brake.
2. Drain oil while engine is warm from operation.
3. Fasten deck belt spans together with mechanics
wire or tie wrap to prevent oil from draining onto
belt.
4. Place pan under machine to catch oil. Remove
the oil drain plug. Allow oil to drain and replace
oil drain plug.
5. Replace the oil lter every other oil change. Clean
around oil lter and unscrew lter to remove.
Before reinstalling new lter, apply a thin coating
of Exmark 4-Cycle Premium Engine Oil on the
surface of the rubber seal. Turn lter clockwise
until rubber seal contacts the lter adapter then
tighten lter an additional 1 full turn.
6. Unlatch radiator and lift it up to access oil ll.
Clean around oil ll cap and remove cap. Fill
to specied capacity and replace cap. Use oil
recommended in the Check Engine Oil Level
section. Do Not overll. Start the engine and
check for leaks.
7. Remove wire or tie wrap from belt spans
8. Start the engine at idle for 5 minutes. Stop engine
and wait three minutes, then check the oil level.
If required, add oil to bring level to the “FULL”
mark on the dipstick. Do Not overll.
9. Check for leaks, including around the oil lter.
10. Wipe up any spilled oil.
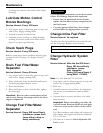
Check Hydraulic Oil Level
Service Interval: Every 40 hours
1. Stop engine and wait for all moving parts to stop.
Engage parking brake.
2. Clean area around hydraulic reservoir cap and
remove cap. Oil level should be to the top of the
bafe inside the tank. If not, add oil. Use Exmark
Premium Hydro oil. Replace hydraulic reservoir
cap and tighten until snug. Do Not overtighten.
Note: The bafe is labeled “HOT” and
“COLD”. The oil level varies with the
temperature of the oil. The “HOT” level shows
the level of oil when it is at 225°F (107°C). The
“COLD” level shows the level of the oil when
it is at 75°F (24°C). Fill to the appropriate level
depending upon the temperature of the oil. For
example: If the oil is about 150°F (65°C), ll to
halfway between the “HOT” and “COLD” levels.
If the oil is at room temperature (about 75°F
(24°C)), ll only to the “COLD” level.
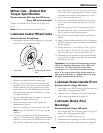
Check Tire Pressures
Service Interval: Every 40 hours
1. Stop engine, wait for all moving parts to stop, and
remove key. Engage parking brake.
33