


6
SECTION 5: ASSEMBLY INSTRUCTIONS
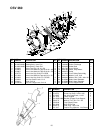
Figure 1
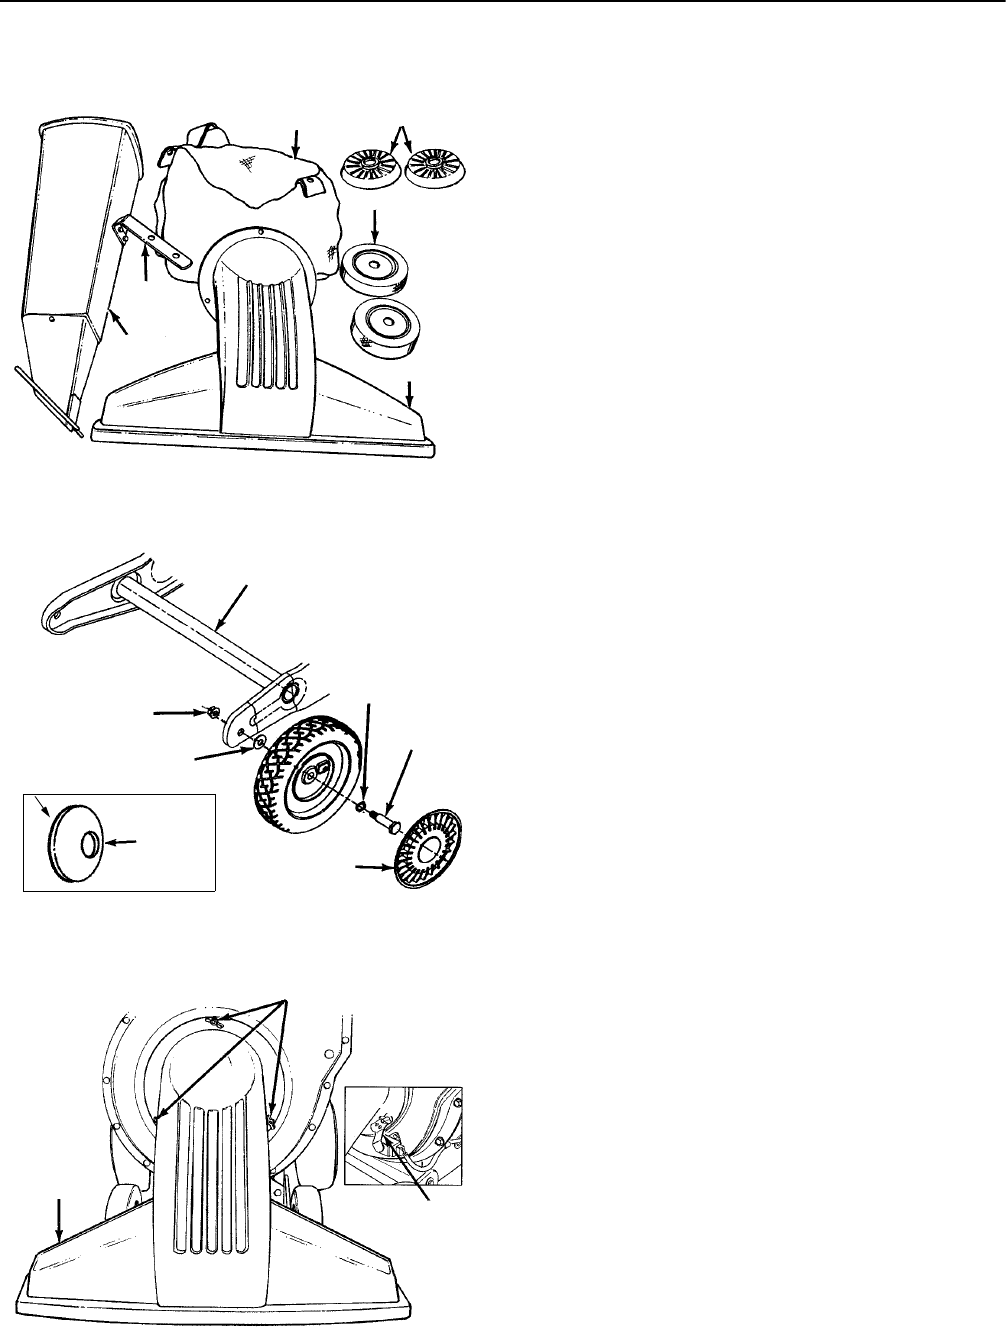
Figure 2
Figure 3
IMPORTANT: This unit is shipped WITHOUT
GASOLINE or OIL in the engine. After assembly,
see separate engine manual for proper fuel and
engine oil recommendations.
NOTE: To determine right and left hand sides of your
chipper-vacuum, stand behind and face the unit.
TO REMOVE CHIPPER-VACUUM FROM
CARTON
1. Remove staples, break glue on top flaps, or cut
tape at carton end and peel along top flap to open
carton.
2. Remove loose parts if included with unit (i.e.,
operator’s manual, etc.).
3. Cut corner’s and lay carton down flat.
4. Remove packing material.
5. Push down on handle to lift the front of the
chipper-vacuum, and roll unit out of carton. Check
carton thoroughly for loose parts.
TOOLS REQUIRED FOR ASSEMBLY
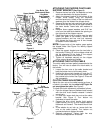
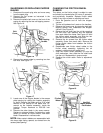
LOOSE PARTS IN CARTON (See Figure 1)
(2) Front Wheels (1) Bag
(2) Hub Caps (1) Shift Knob†
(1) Nozzle (1) Tamper Plug† (Opt.)
(1) Chipper Chute (1) Safety Glasses†
(1) Support Bracket
†Not Shown
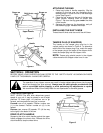
ATTACHING THE FRONT WHEELS
1. Tilt unit backward so that it rests on the handle
(place a piece of the carton under handle to avoid
scratches). Remove the cardboard packing
material around the wheel brackets.
2. Remove the hex lock nuts and shoulder bolts from
the front of the wheel brackets. See Figure 2.
3. Place wave washer on shoulder bolt. Insert
shoulder bolt through wheel, with the head of the
shoulder bolt through the flat side of the wheel.
4. Place cupped washer on shoulder bolt (crowned
side of washer goes against the wheel).
5. Assemble wheel to outside of wheel bracket.
Secure hex lock nut. Tighten.
6. Attach hub caps to wheels by placing in position
against the inner hub of the wheel. Press firmly
around the center portion of hub cap in a circular
motion, similar to installing a lid on a round, plastic
container. The hub caps are flexible and will snap
over the wheel hubs.
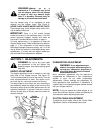
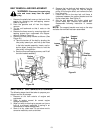
ATTACHING THE NOZZLE (See Figure 3)
1. Remove three wing nuts from the front of the
chipper-vacuum. Place nozzle in position over the
three studs. Secure with wing nuts just removed.
NOTE: The metal tab on the nozzle must depress the
safety switch on the front of the chipper-vacuum or the
engine will not start.
2. Set unit in upright position.
Bag
Hub Caps
Front Wheels
Nozzle
Chipper
Chute
Support
Bracket
Wheel Bracket
Wave
Washer
Shoulder
Bolt
Hub
Cap
Crowned
Side
Cupped
Washer
Hex Lock
Nut
Cupped
Side
Metal Tab
Nozzle
Wing Nuts
(1) 3/4" Open End Wrench* (2) 1/2" Wrenches*
(1) Funnel (1) 9/16" Wrench*
(1) Set of Pliers (2) 7/16" Wrenches*
*Adjustable wrenches may be used.