


13
BELT REMOVAL AND REPLACEMENT
WARNING:
Disconnect the spark plug
wire and move away from the spark
plug.
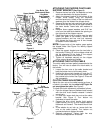
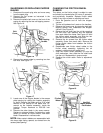
1. Remove the plastic belt cover on the front of the
engine by removing two self-tapping screws.
Refer to Figure 16.
2. Drain the gasoline and oil from the chipper-
vacuum.
3. Tip the unit backward so that it rests on the
handles.
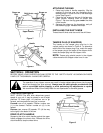
4. Remove the frame cover by removing eight self-
tapping screws from underneath the chipper-
vacuum. Refer to Figure 18.
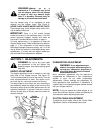
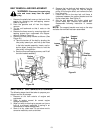
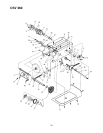
5. Remove the idler pulley bracket as follows. (See
Figure 20.)
a. Take the tension off the belt by pivoting the
idler pulley toward you, and line up the holes
in the idler bracket assembly. Insert a nail or
similar object through the holes to hold the
idler pulley in this position.
b. Remove three self-tapping screws, and lift off
the idler bracket assembly.
Figure 20
6. Remove the hex bolt and lock washer from the
engine pulley. See Figure 20. Slip the engine
pulley off the engine shaft, and remove the belt
from the pulley.
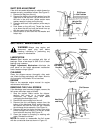
7. Loosen the nut on the stop bolt until there is
clearance between the support bracket and the
friction wheel disc. See Figure 21.
8. Slip the belt between the friction wheel and
friction wheel disc. Remove and replace belt.
Reassemble following instruction in reverse
order.
NOTE: The support bracket must rest on the stop
bolt after the new belt has been assembled.
Figure 21
SECTION 9: OFF-SEASON STORAGE
The following steps should be taken to prepare your
chipper-vacuum for storage.
1. Remove all dirt from exterior of engine and
equipment.
2. Refer to engine manual for correct engine
storage instructions.
3. Wipe unit with an oiled rag to prevent rust (use a
light oil or silicone), especially if storing in an
unventilated or metal storage shed.
4. Store in a dry, clean area. Do not store next to
corrosive materials, such as fertilizer.
Engine
Pulley
Idler
Pulley
Idler
Bracket
Assembly
Self-Tapping
Screws
Nail
Support
Bracket
Stop Bolt
Loosen
Nut
Friction
Wheel Disc