


21
SECTION 11: STORAGE
NOTE: Before removing the tiller attachment for
storage, perform all lubrication maintenance as outlined
in the Maintenance section.
Removing the Tiller
NOTE: When removing the tiller attachment, because
the tiller is awkward, it is recommended that the tiller be
removed in a place that will not require it to be moved
regularly. It would also be helpful when removing the
tiller to allow approximately five feet of space in front of
the tractor. This will make the removal process simpler.
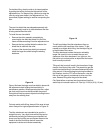
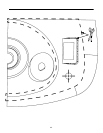
Setting the Tiller Stand
Before removing the tiller from the tractor for storage, it
is recommended that the roller be set in the lowest
position and the tiller stand be set.
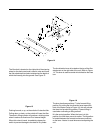
To set the tiller stand, remove the hairpin clip (refer to
Figure 23) and clevis pin. The tiller stand will be free to
slide in its bracket. Align the tiller stand so the storage
position hole is lined up with the hole in the tiller stand
bracket and reinstall the clevis pin and hairpin clip.
Figure 23
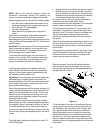
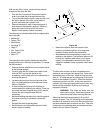
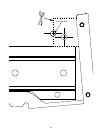
Removing the Hydraulic Pump Assembly
To remove the hydraulic pump assembly, the hydraulic
pump drive belt must first be removed. See the
Maintenance section for this procedure.
Once the belt is removed, proceed as follows:
• To remove the front hanger rod which suspends the
front of the hydraulic pump assembly, there are two
hairpin clips that hold the front hanger rod in place.
There is one on each side of the tractors frame.
Only one of these pins needs to be removed.
Remove hairpin clip on the left side of the tractor.
• Supporting the weight of the hydraulic pump
assembly with one hand, use the other hand to
slide the front hanger rod out the right side of the
tractor. Set the front of the hydraulic pump
assembly carefully on the ground.
• The rear of the hydraulic pump assembly is
supported by a tongue that is slid inside the rear
mounting bracket mounted to the tractor. Using
both hands, carefully pull the hydraulic pump
assembly towards the front of the tractor and the
assembly will become free of the rear mounting
bracket.
Figure 24
At this point, leave the hydraulic pump assembly setting
under the center of the tractor’s frame. With the tiller
unattached, the tractor can be pushed over the
hydraulic pump assembly with hydraulic hoses still
attached.
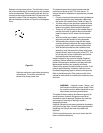
Releasing the Sleeve Hitch/Removing the Tiller
To release the sleeve hitch from the attachment hitch
on the tractor, locate these items in Figure 25 and
proceed as follows:
• Remove the lower clevis pin on the electric lift
cylinder by first removing the hairpin clip and sliding
out the clevis pin from the right side. Note the order
of the spacers and washer as they rest on the clevis
pin.
• Release the left and right hitch latches. To do this
requires the removal of the clevis pin which locks
the latches in place. Pull the hairpin and slide the
clevis pin out of the sleeve hitch on both sides. At
this point the pivoting hitch latches are free.
• Place the tractor transmission release lever into the
released position and release the parking brake.
Hairpin Clip
Clevis Pin
Tiller Stand
Operating
Position
Storage
Position
Hole
Hole
(Sleeve Hitch not Shown for Clarity)
Tiller Stand
Bracket