


19
With the new filter in place, remove all tools used to
change the filter from the tiller:
• Start the tiller in motion for about one minute in
order to circulate the oil through the new filter.
• Turn off the tiller and the tractor, lower the tiller until
the top flat portion of the tiller is level with the
ground, and check the hydraulic fluid.
• Remove the dipstick, wipe it clean and tighten it
back down on the hydraulic reservoir. Remove it
again and check the level of the fluid on the
dipstick. Add hydraulic fluid as necessary.
The following list includes fluids which are approved for
use in this tiller:
• Mobile 424
• Texaco TDH
• Shell Donax
• Farmland TF
• Citgo TF
• Sun Tractor Fluid
• Amoco 1000
• Shell TTF
Hydraulic Fluid
The hydraulic fluid in the tiller attachment should be
changed after every 100 hours of operation. To change
the fluid correctly:
• Remove the tiller attachment from the tractor (refer
to the Storage section).
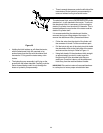
• Carefully pivot the tiller forward so it rests on the
tines (do NOT use the tiller stand for this
procedure), until the front point of the sleeve hitch is
touching the ground.
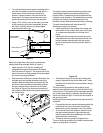
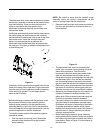
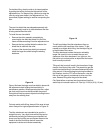
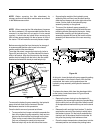
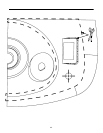
• Locate the drain plug on the front left side of the
tiller. It is slightly above the front deflector shield.
Refer to Figure 20.
• A drain pan that will hold up to five gallons is
recommended for collecting the used oil. Place the
pan under the drain plug and using a 5/8” wrench,
remove the drain plug and drain the fluid
completely.
• Before reinstalling the drain plug, check the gasket
for cracks or tearing. If necessary, replace the
gasket.
• Reinstall the drain plug and tighten.
• Set tiller back to a level position and set the tiller
stand in place for stability.
Figure 20
• Remove the dipstick from the hydraulic fluid
reservoir and add four gallons of an approved
hydraulic fluid as noted in the previous list.
• Add additional fluid as necessary to reach a full
reading on the dipstick. The hydraulic reservoir will
hold up to 4.5 gallons when empty, but in some
cases it is not possible to remove all of the fluid.
Using this method will help to prevent overfill when
refilling.
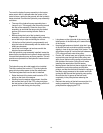
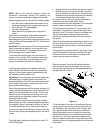
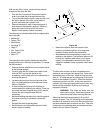
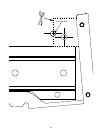
Replacing the Tines
The tiller tines will wear out over time based on the
amount of use and type of soil being tilled. There are 20
replaceable tines on the tiller. When the tines are new,
there is 1.5” inches across the cutting end of the tine as
shown in the window of Figure 21. When this distance
measures less than one inch, all the tines need to be
replaced. If the tines get used past this point, they may
become brittle and break off during use causing a
dangerous situation.
WARNING: Tiller tines are sharp and can
cause serious injury. Wear heavy gloves and
use extra caution when servicing the tines.
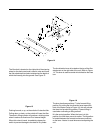
Removing the tiller tines requires a 9/16” and 3/4”
wrench or socket. The 3/4” wrench fits on the bolt head
and the 9/16” wrench fits on the nut. Remove both inner
and outer shoulder bolts to remove one tine. Take note
of the order of the shoulder bolts and washers as they
hold the tine on. Refer to Figure 21.