


16
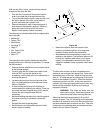
Engaging the Tiller
NOTE: Refer to the tractor’s operator’s manual for
information concerning starting and stopping the
tractor, and location and proper usage of its controls.
Before engaging the tiller, complete the following steps:
• Start the tractor’s engine and make certain it is at
operating temperature (the engine is warmed up).
• Verify that the PTO is disengaged.
• Lock the parking brake.
• Raise the tiller to its highest point using the lift
switch.
Select the tine direction by shifting the tine direction
lever into the forward (F) or reverse (R) position
depending on the type of tilling to be performed. Set the
tractor to full throttle and engage the PTO. The tines will
now be turning.
IMPORTANT: Turn the tractor’s PTO into the off position
before changing tine direction. Do not move the tine
direction lever with the PTO engaged. Doing so will
cause damage to the hydraulic motor.
To shift the tine selection lever from one position to
another, first turn off the PTO and wait for the tines to
come to a complete stop. Then shift the lever to any
position as necessary as outlined in Section 8.
Tilling Ground Speed
The tilling ground speed is the speed at which the
tractor travels while the tiller is set in the ground and
working. Correct ground speed is determined by the
soil conditions and the depth of cut.
IMPORTANT: Do not attempt to use the tiller attachment
while backing up. A safety switch on the tractor will
automatically shut off the PTO when the reverse pedal
on the tractor is depressed. Always lift the tiller out of
the ground before backing up.
When tilling hard ground, with the engine running at full
throttle, the ground speed of the tractor should be less
than 30% of the top speed of the tractor. This will vary
based on the soil. If the engine is slowing at all or the
tractor and tiller are vibrating or shaking, the ground
speed should be slowed.
When tilling soft or previously tilled ground, a slightly
higher speed, up to 50% of the total speed of the tractor
is acceptable. Again, if noticeable vibration or shaking
of the tiller attachment occur, reduce ground speed.
A slow ground speed while tilling will produce the finest
tilled soil and a faster ground speed results in soil that is
coarse.
Tilling Depth
The tilling depth is determined using the lift switch. To
set the tilling depth:
• Engage the tiller as outlined in the previous section.
• With the tractor, running at full throttle, in position,
use the lift switch to lower the tiller into the ground.
Be aware that as the tiller penetrates the ground, it
will shake and vibrate the tractor initially.
Kit number 190-014-100 is an optional skid shoe kit,
available at your Cub Cadet dealer, that is
recommended for the tiller attachment. The skid shoes
make it simpler to determine tilling depth.
The tines can be lowered from 0” to a maximum 6.5”
tilling depth. It is important to set the tiller depth while
the tractor is NOT in motion. Come to a complete stop
with the tractor before raising or lowering the tiller
attachment, especially when the tines are working in
the ground.
When tilling hard ground or when tilling an area for the
first time, do not till more than 2” at a time. To increase
the tilling depth, lower the tiller on successive passes
over the area.
If tilling softer or previously tilled soil, tilling up to 3” per
pass is acceptable. If vibration or shaking of the tiller
attachment occur, the tiller depth is too deep or the
tractor’s ground speed is excessive.
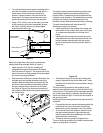
Using the Roller
When set properly, the roller will help eliminate the
need for after till raking and leveling. The roller has
several height settings that can be used depending on
the depth the tiller is set at.
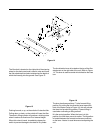
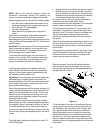
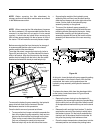
Figure 17
To set the height of the roller, first make sure that the
tractor engine is not running and the parking brake is
set. Standing on the right side of roller, facing it, hold
the u-handle located on the back frame of the roller.
While lifting slightly on the u-handle, pull the spring
loaded locking rod clear of the adjustment bar and lift
the roller up or set it down based on the depth of the
tilling to be done. Release the locking rod in one of the
adjustment holes in the adjustment bar to lock the roller
into position.