


12
SECTION 7: MOUNTING THE TILLER
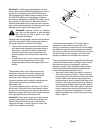
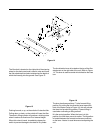
Installing the Attachment Hitch
The attachment hitch, which has the electric lift cylinder
attached to it, attaches to the rear of the tractor’s frame
over the hitch plate. There is a short clevis pin and
cotter pin mounted to the lower portion of the
attachment hitch during shipping, remove them now
and set them aside.
Holding the attachment hitch with the hitch hooks facing
the tractor, place the hitch hooks over the mounting
bolts and allow the attachment hitch to rest on the hitch
plate of the tractor. Install the clevis pin removed
earlier, into the holes that line up between the
attachment hitch and the hitch plate, and secure with
the cotter pin. This clevis pin holds the attachment hitch
in place during use.
Figure 11
The electric lift wiring harness is mounted near the rear
frame of the tractor on the right side. Plug the connector
from the electric lift wiring harness into the mated plug
on the electric lift cylinder. This will supply electric
power to the lift cylinder.
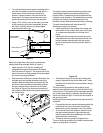
Attaching the Tiller Assembly
Before continuing, be certain that the hydraulic hoses
are connected to both the tiller assembly and the
hydraulic pump assembly. Set the hydraulic pump
assembly directly in front of the tiller on the ground as
far as the hoses will allow. Align the tractor so it can be
pushed straight back to the tiller attachment.
To attach the tractor and the tiller assembly together,
proceed as follows:
• With the tractor not running, push it backwards
toward the tiller attachment over the hydraulic
pump assembly.
NOTE: Be careful to insure that the hydraulic pump
assembly clears the tractor’s transmission as the
tractor is moving toward the tiller attachment.
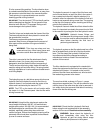
• Release the left and right hitch latches by removing
the clevis pin and cotter pin that secure them in a
locked position.
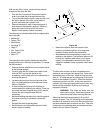
Figure 12
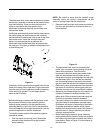
• The attachment hitch, which is mounted to the
tractor, has a cross bar running through it that the
sleeve hitch attaches to. Push the tractor
backwards to the point where the crossbar ends
slide into the channels below the hitch latches.
Doing this will require some aligning of the tiller with
the attachment hitch. Once the two are attached,
lock the parking brake on the tractor and reinstall
the clevis pins that lock the hitch latches into place.
• Remove the clevis pin and spacers from the end of
the electric lift cylinder by removing the cotter pin.
Slide the clevis pin out and set aside the hardware.
• Maneuver the unattached portion of the electric lift
cylinder in between the slotted channels of the
sleeve hitch. Raise or lower the cylinder using the
lift switch on the tractor’s dash if necessary.
• Connect the electric lift cylinder to the sleeve hitch
using the clevis pin and spacers removed earlier.
One spacer will mount on either side of the electric
lift cylinder shaft and the washer will be placed
outside of the channels on the end of the clevis pin
with the hole in it. Secure the clevis pin with the
cotter pin removed earlier.
• Before attaching the hydraulic pump assembly,
make certain that the hydraulic hoses are routed to
the inside of the hose hook and under the tractor’s
transmission. Refer to Figure 12 for the location of
the hose hook.