


SERVICE AND ADJUSTMENTS
REPLACE THE CHIPPER CUTTING BLADE
Over time, the chipper cutting blade edge (A in Figure 33
on Page 31) will dul!. Sharpen or replace the blade
when the chipper no longer cuts efficiently,
_3
E3
Discard a cracked or severely nicked blade because
the blade could break apart and cause personal
injury.
We recommended thatyou takethebladetoa
professional sharpening service for expert
sharpening,, All grinding must be flat and uniform
along the beveled edge of the blade to maintain the
original 45 o cutting angle. Sharpen a blade that is
dull or that has only minor nicks. The blade is made
from tempered steel and is extremely hard - do not
attempt to sharpen with a hand file
iMPORTANT: Do not reuse the blade mounting screws
and locknuts. New screws and tocknuts are supplied
with a new blade Use only factory-supplied
hardware. Do not use substitutes or failure of the
equipment or personal injury could result. See the
Parts List at the back of this Manual to order individual
replacement screws and Iocknuts if re-installing the old
blade.
To Remove and Replace the Blade
1, Stop the engine and make sure that all moving
parts have come to a complete stop. Disconnect the
spark wire and secure it away from the spark plug.
2. Remove the collection bag or the blower deflector,
3o The blade removal procedure requires removal of the
engine. To avoid a potential safety hazard from spilled
gasoline, the fuel tank must be emptied of alt gasoline
before the engine is removed, Follow Steps "a" through
"d" to empty the fuel tank,
a. Place a clean pan below the fuel tank to catch the
gasoline as it drains Remove gas cap from fuel tank,
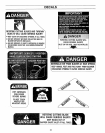
DANSER
Gasoline and its vapors are highly flammable and
explosive.
To avoid serious personal injury, be sure area is
well ventilated and keep gasoline away from open
flame or sparks, Observeno smoking rules at atl
times_ Use an approvedfuel conlainer.
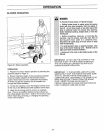
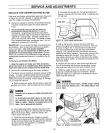
b. Using adjustable pliers, squeeze the tabs on the
hose clamp (A in Figure 31) that secures the fuel line
(B) to the fuel tank fitting. Slide the clamp a few
inches down the fuel Iine.
c. Pinch the fuel line with your fingers to prevent
gasoline from leaking and then gently pull the fuel line
off the fuel tank fitting Drain the gasoline into the pan
and then transfer the gasoline to a container
designed for fuel storage,
d. Re-install the fuel line on the fuel tank fitting and
secure it in place with the hose clamp. Install gas cap
on fuel tank.
FuelTank
Figure 31: Hose clamp and fuel line.
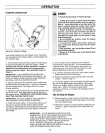
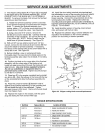
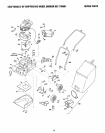
4. With a 3/8" wrench, remove the three bolts that
secure the engine mounting base to the deck. One bolt
is shown in Figure 32. A second bolt is located at the
rear of the machine above the left side of the blower
opening. This second bolt also secures the short wire
leading to the safety interlock,. Remove the wire and the
Iockwasher along with this bolt. Also, disconnect the
long safety interlock wire where it attaches to the engine
above the engine muffler, A third bolt is located near the
right front wheel
5. Remove the two hair pin clips on the right side and
rear of the housing which secure the shredder screen
rods, and then remove the rods and shredder screen,
6, Slide the engine forward (in direction of the spark
plug) and carefully lift engine out of chassis., Gently
place the engine on a clean floor or workbench with the
spark plug side facing up.
WARNIH8
To avoid personal injury, handle chipper cutting
blade with extreme care,, The cutting edge is very
sharp°
Figure 32: Engine mounting bolts.
3O