


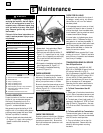

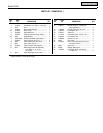

20 Section 5: Maintenance
Before inspecting, cleaning or servicing the machine, shut off engine, wait for all moving parts to come
to a complete stop, remove ignition key on electric start models, disconnect spark plug wire and move
wire away from spark plug.
Failure to follow these instructions can result in serious personal injury or property damage.
WARNING
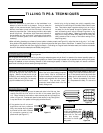
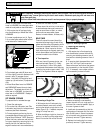
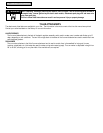
2. Belt adjustments are done with the
forward clutch cable adjuster (F, Figure
5-11). Use two 1/2", open-end wrenches
to loosen the two jam nuts (A, Figure 5-
12) a few turns.
3. Move cable adjuster (B, Figure 5-12)
downward for more belt tension (see
Figure 5-12).
4. Hand tighten the jam nuts and pull the
Forward Clutch Control levers up against
the handlebar. Measure the coiled part of
the spring (Figure 5-10). The length of the
extended coil should be 2-1/2". Repeat
this procedure until the extended spring
length is correct.
5. Tighten both jam nuts securely.
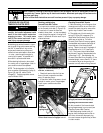
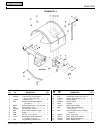
FORWARD CLUTCH BELT REMOVAL
AND INSTALLATION
NOTE: The photographs in this Section
show a reverse drive assembly (pulley, A,
Figure 5-8), belt (B), cable (C) and
linkage(D). These components are not
used on Model 12226.
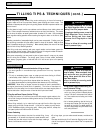
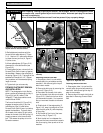
The forward clutch belt (K, Figure 5-14)
engages the engine pulley (I) and the
transmission pulley (J) when either
Forward Clutch Control Lever is pulled up
against the handlebar. The lever draws
the forward clutch cable (G) tight, which
causes the forward clutch idler pulley (H)
to apply pressure to the forward clutch
belt. This causes the pulleys to turn for
Forward movement.
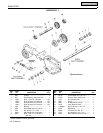
Removing Forward Clutch Belt
1. Stop engine, allow it to cool and dis-
connect spark plug wire before working
near belts. Also remove ignition key on
electric start models.
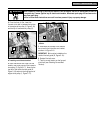
2. Remove the belt cover by removing the
two nuts (C, Figure 5-13).
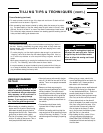
3. Disconnect the forward clutch cable
from the forward clutch idler arm bracket
(Figure 5-15). Note the hole from which
you disconnect the cable. It is important
that you reconnect the cable to the same
hole.
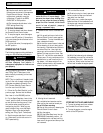
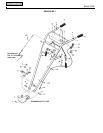
4. Slide the belt off the engine pulley (C,
Figure 5-16), away from engine, out from
under the belt guide (D), and completely
off the pulley.
5. Slip the belt off the front of the trans-
mission pulley (F, Figure 5-17).
6. Work the belt out from between the
pulley and the frame, around the transmis-
sion cover spring, then up and out of the
machine.
Installing Forward Clutch Belt
1. Stop engine, allow it to cool and dis-
connect spark plug wire before working
near belts. Also remove ignition key on
electric start models.
2. Remove the old forward clutch belt as
described in Removing Forward Clutch
Belt.
Figure 5-13: Belt cover.
Figure 5-12: Move forward clutch cable
adjuster down for more belt tension.
A
More Belt
Tension.
B
C
Figure 5-14: Forward clutch control
assembly.
G
I
J
H
K
Figure 5-16 : Right-side view.
Figure 5-15
Figure 5-17: Left-side view.
Forward Clutch
Idler Arm
Forward Clutch
Cable
Connection
D
E
C
F
L