


Frequency Generator for the Spartan-3E Starter Kit 3
Design Overview
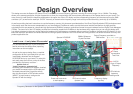
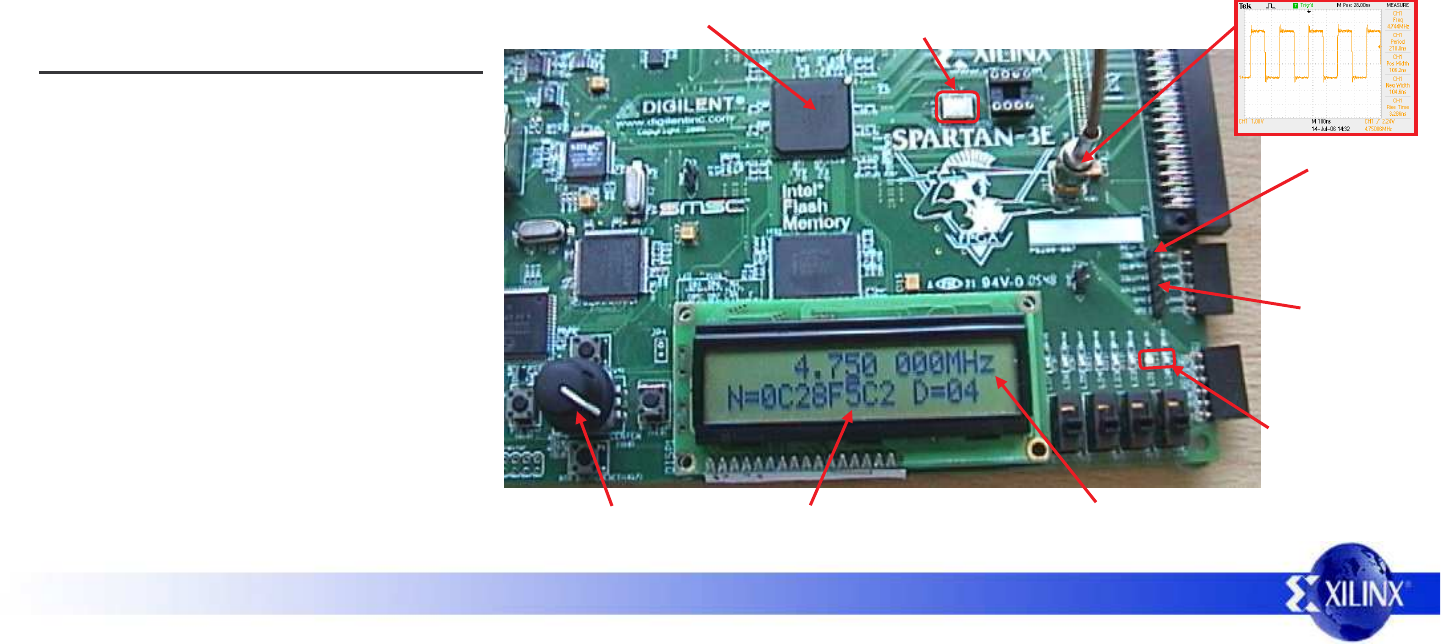
This design converts the Spartan-3E Starter Kit into a reasonably accurate frequency generator covering the nominal range 1Hz to 100MHz. The design
allows you to attempt generation of higher frequencies to allow you to experiment with the maximum performance of the Spartan device on your board. The
rotary control is used to edit the frequency displayed on the upper line of the LCD display and the corresponding frequency will then be output on the SMA
connector (J17) as well as the stake pin J4-IO12. Internally to the device the frequency range is twice that provided externally (nominally up to 200MHz).
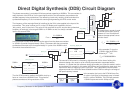
As well as providing the basic instructions to use the frequency counter, this document provides details of the Direct Digital Synthesis (DDS) techniques used
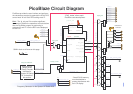
in the design such that the can be transplanted into your own designs. PicoBlaze is used to provide the human interface and perform so high precision
calculations which are passed to a simple but high performance (200MHz) frequency synthesizer formed from pure hardware and two Digital Clock Managers
(DCMs). The lower line of the LCD display provides the information passed from PicoBlaze to the hardware which means that you can use this design with
your board to determine the exact values required to implement a fixed frequency synthesizer without requiring PicoBlaze, the knob and LCD display. On this
board the technique provides a convenient alternative to fitting a special oscillator in the IC16 socket and it may proves a cost effective solution for many real
product applications too.
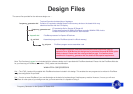
As well as the source design files, a compiled
configuration bit file is provided which you can
immediately download into the Spartan
XC3S500E device on your board. To make this
task really easy the first time, unzip all the files
provided into a directory and then….
double click on
‘install_frequency_generator.bat’.
Assuming you have the Xilinx software installed,
your board connected with the USB cable and
the board powered (don’t forget the switch),
then this should open a DOS window and run
iMPACT in batch mode to configure the
Spartan-3E with the design.
Load it now – it only takes 30 seconds!
It is recommended that you try this to become
familiar with what the design does (operating
instructions on the next page).
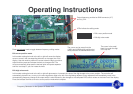
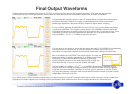
Output Frequency provided on
SMA socket
Frequency display
(top line)
50MHz Reference
Crystal Oscillator
LEDs indicate
frequency
editing mode
Spartan XC3S500E
Press and rotate knob
to set frequency
DDS control values
(bottom line)
J4-IO9
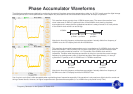
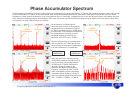
Phase
Accumulator
Test Point
J4-IO12
Copy of Output
Frequency